Writeup for fixing slow wipers, specifically for a 2001 A4. Text
appears above the reference pics, unless otherwise noted. Standard DIY
disclaimer applies.
Tools / Supplies:
8mm socket or nut driver
10mm socket
13mm socket
2" socket extension
Small flathead screw driver
Medium flathead screw driver
#2 Philips head screw driver
Soft wire brush (I used a brass bristled brush)
Grease
Time: @ 1 hour
Difficulty: 2/10
Begin by stalling your wipers in the verticle position. Remove the
battery/rear firewall cover. Using a small flathead screwdriver, pop
off the wiper arm spline covers.

Using a 13mm socket, remove the retaining nut that holds each wiper arm to the spline.

Once the nuts are removed, carefully rock the wiper arm using an up and
down motion as you pull up on the arm at the mounting point. Do not
rotate the arms in a wiping motion or you could strip the splines. When
you have both arms off, remove the plastic cowl by undoing the four
quarter-turn plastic philips screws. There's also a metal clip at the
end on the drivers side (visible as the rusty square below and right
from the wiper arm in the above pics).
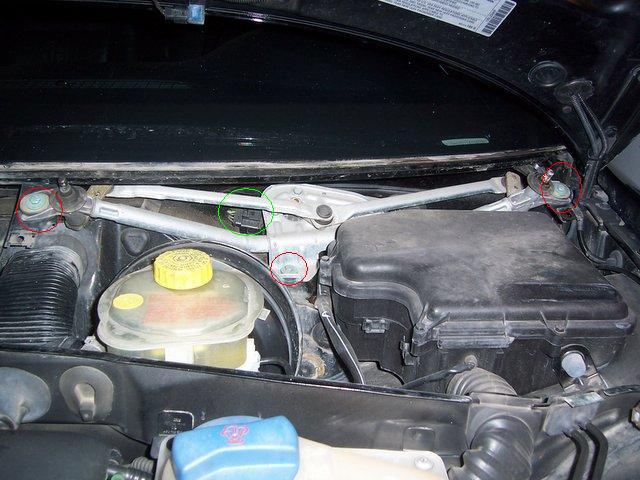
With the cowl removed, the entire wiper assembly should be visible. The
assembly is held in with 3 10mm bolts and an electrical harness. The
three bolts are circled in red, and the harness is circled in green.
Undo the 3 bolts. Unless you have infant hands, don't try to undo the
harness just yet. There's at least 6" of wiring behind it that makes
undoing it easier once the whole assembly is out of the cavity (via a
later step).
In order to pull the assembly from the cavity, you'll need to make some
room, because the wiper motor that's mounted on the back of the
assembly is about the size of a can of Campbell's soup. To make room,
remove the engine ECU cover, which is held in place with a few 8mm
screws. At this point, You should have something like this. (obligatory
beer shot)

Now you should have room to work the assembly out of there. It might
try to catch on the mounting points at the ends, so be persistant, and
use different angles. I took mine out by freeing the pass side of the
assembly first. Be mindfull of the exposed ECU and components. Don't
knock them around. Now with the assembly out of the cavity, it should
be easy to reach the electrical harness. Press the release button on
the harness and disconnect it.

Take the assembly over to your workbench for the troubleshooting (don't
mind my mess). Here it is, in all of it's glory. The motor is mounted
in the middle. As it turns, it pushes/pulls on the linkage arms, which
then push or pull on levers that are mounted to the splines. (NOTE: I
think I have the direction of rotation of the motor in the middle going
the wrong way. It should turn clockwise.)

At this point, I noticed some crud on my splines, so I took the
opportunity to clean them using some WD-40 and a brass bristle wire
brush. Remove the rubber caps from the splines and start cleaning.
Don't damage the splines while scrubbing them. They're pretty delicate.


To troubleshoot where my wipers were binding, I disconnected the
linkage arms from the center motor. I used a flathead screwdriver to
lever the plastic ends out of the ball joint. Both linkages are mounted
to the same balljoint. During dissassembly, the passenger side linkage
is removed first, then the driver's side.

Once the linkages are free from the motor, the splines "should" be free
to rotate in their housings. I was able to actuate the passenger side
just fine with no effort, however, my driver's side wouldn't budge. It
was ceased pretty good. I even pounded on the lever arm with a BFH to
try to free up the spline shaft, but that didn't do any good either.
That wiper motor has to be pretty powerful to be able to move that
thing as slowly as it did.
Now that I've identified where my binding was coming from, I also
wanted to test the wiper motor to make sure it wasn't damaged or
burned-out from making that ceased spline move. Plug it back into the
electrical harness and make sure the assembly is free from
obstructions. Turn on the wipers. Mine worked like a champ, so I
proceded to clean the ceased driver's side spline shaft.
The spline shaft is held in place by a washer and a circlip at the base
of the splines. You can barely make them out in this pic. I used a
small flathead screwdriver to remove the circlip. If you choose to take
this approach, try not to stab yourself in the hand when it slips.
When you have the circlip and washer removed from the spline shaft, the
only thing that's holding it in is friction. I used PB Blaster and a
hammer to pound the spline out the back of the housing. Again, don't
damage the splines. Threat the 13mm wiper arm mounting bolt back on, if
your aim is that bad. Here you can see my spline shaft halfway out, and
you start to see the corrosion that was going on inside. Also, the
removed circlip retainer and washer are visible on the work surface.

All's that's left is to clean the shaft and the inside of the housing,
followed by a generous lubing with some grease. Reassemble everything
and reinstall it all in reverse order.
*NOTE: when working with any part of your car's electrical system, it
would probably be a good idea to disconnect the battery. I did not do
this, and got lucky. Fate was with me. Have your radio code handy
before you disconnect the battery.