
 07-22-2016, 02:38 PM
Last edit by: IB Advertising
See related guides and technical advice from our community experts:
- Audi A4 B7 How to Replace Tail Light Bulbs<br>Step by step instructions for do-it-yourself repairs.

DIY: How to replace rear tail light bulb (B7)

 07-23-2012, 09:05 AM
#14
AudiWorld Newcomer

Join Date: Sep 2011
Posts: 5
Likes: 0
Received 0 Likes
on
0 Posts
Yes, still useful - is the orientation of the plastic nubs the same on the Avant? (I will try tonight.)
Anyone know the lamp part # for the outside blub (brake/turn signal) for an '07 A4 Avant (or a good place to get this info)?
Thanks in advance.
Anyone know the lamp part # for the outside blub (brake/turn signal) for an '07 A4 Avant (or a good place to get this info)?
Thanks in advance.
07-27-2012, 09:24 AM
#15
AudiWorld Senior Member
07-28-2012, 03:19 AM
#16
AudiWorld Newcomer
Join Date: Sep 2011
Posts: 5
Likes: 0
Received 0 Likes
on
0 Posts
Answering my own questions here:
1) Avant assebly removal appears to be the same as sedan (with respect to pulling straight out to the side of the vehicle) - a putty knife wrapped in electrical tape did the job.
2) Bulb goes by a few different numbers but is a standard "1156" which I've used on cars off/on since my '73 Chevy :-)
 03-17-2013, 11:06 AM
#18
AudiWorld Newcomer

Join Date: Dec 2009
Posts: 5
Likes: 0
Received 0 Likes
on
0 Posts
Thank you for posting a complete write-up. It helped tremendously.  I followed your write-up until I tried to pull the unit out carefully from what I read and interpreted in your writ-eup. I couldn't do that (pull only a 1/4 inch on the edge then grip bottom and pull straight out -- so I consulted the repair manual. According to the Bentley manual all you need to do is gently pull the tailight unit out holding the inner edge (side with the rubber gasket) and swing it outward like opening a door. It will pivot and release at the plastic post location easily. I tried that I that worked easier for me. In short, in stead of stopping at 1/4 inch, just keep going for about 3 inches and it'll release.
The next step, getting the taillight assembly out, is the most delicate portion of the whole operation I think. The reason is: there are two plastic posts (see Pic #4 below) on the taillight assembly that fit into two holes with rubber grommets (see Pic #5 below). You definitely do not want to snap either or both off or your whole savings on this DIY project will be wiped out plus some!


Gently start pulling evenly on the right side of the taillight assembly where the moulded part fits into the trunk drain channel. I repeatedly did this until it slowly started to come away from the body, about a Ľ” max initially on the right side. Then I was able to get a grip on the bottom of the taillight assembly and pulled straight out, again, slowly and carefully. Eventually the rubber grommets let the plastic posts go. The key is not to get the right side of the assembly out too far risking bending and snapping the plastic posts. Pic #4 above shows the taillight assembly just after it was removed.
I followed your write-up until I tried to pull the unit out carefully from what I read and interpreted in your writ-eup. I couldn't do that (pull only a 1/4 inch on the edge then grip bottom and pull straight out -- so I consulted the repair manual. According to the Bentley manual all you need to do is gently pull the tailight unit out holding the inner edge (side with the rubber gasket) and swing it outward like opening a door. It will pivot and release at the plastic post location easily. I tried that I that worked easier for me. In short, in stead of stopping at 1/4 inch, just keep going for about 3 inches and it'll release.The next step, getting the taillight assembly out, is the most delicate portion of the whole operation I think. The reason is: there are two plastic posts (see Pic #4 below) on the taillight assembly that fit into two holes with rubber grommets (see Pic #5 below). You definitely do not want to snap either or both off or your whole savings on this DIY project will be wiped out plus some!
Gently start pulling evenly on the right side of the taillight assembly where the moulded part fits into the trunk drain channel. I repeatedly did this until it slowly started to come away from the body, about a Ľ” max initially on the right side. Then I was able to get a grip on the bottom of the taillight assembly and pulled straight out, again, slowly and carefully. Eventually the rubber grommets let the plastic posts go. The key is not to get the right side of the assembly out too far risking bending and snapping the plastic posts. Pic #4 above shows the taillight assembly just after it was removed.
03-18-2013, 04:34 AM
#19
AudiWorld Senior Member
Thread Starter
Join Date: Nov 2009
Location: Montreal, Que. (Canada)
Posts: 1,504
Likes: 0
Received 3 Likes
on
3 Posts
Thank you for posting a complete write-up. It helped tremendously. I followed your write-up until I tried to pull the unit out carefully from what I read and interpreted in your writ-eup. I couldn't do that (pull only a 1/4 inch on the edge then grip bottom and pull straight out -- so I consulted the repair manual. According to the Bentley manual all you need to do is gently pull the tailight unit out holding the inner edge (side with the rubber gasket) and swing it outward like opening a door. It will pivot and release at the plastic post location easily. I tried that I that worked easier for me. In short, in stead of stopping at 1/4 inch, just keep going for about 3 inches and it'll release.
I followed your write-up until I tried to pull the unit out carefully from what I read and interpreted in your writ-eup. I couldn't do that (pull only a 1/4 inch on the edge then grip bottom and pull straight out -- so I consulted the repair manual. According to the Bentley manual all you need to do is gently pull the tailight unit out holding the inner edge (side with the rubber gasket) and swing it outward like opening a door. It will pivot and release at the plastic post location easily. I tried that I that worked easier for me. In short, in stead of stopping at 1/4 inch, just keep going for about 3 inches and it'll release.Take care!
03-18-2013, 09:59 AM
#20
AudiWorld Newcomer
Join Date: Dec 2009
Posts: 5
Likes: 0
Received 0 Likes
on
0 Posts
Thank you. It's because of the helpful posts like yours that I've been able to service and upgrade my car.
For further help, here's a photo illustration of the "Swivel outwards to release" technique.
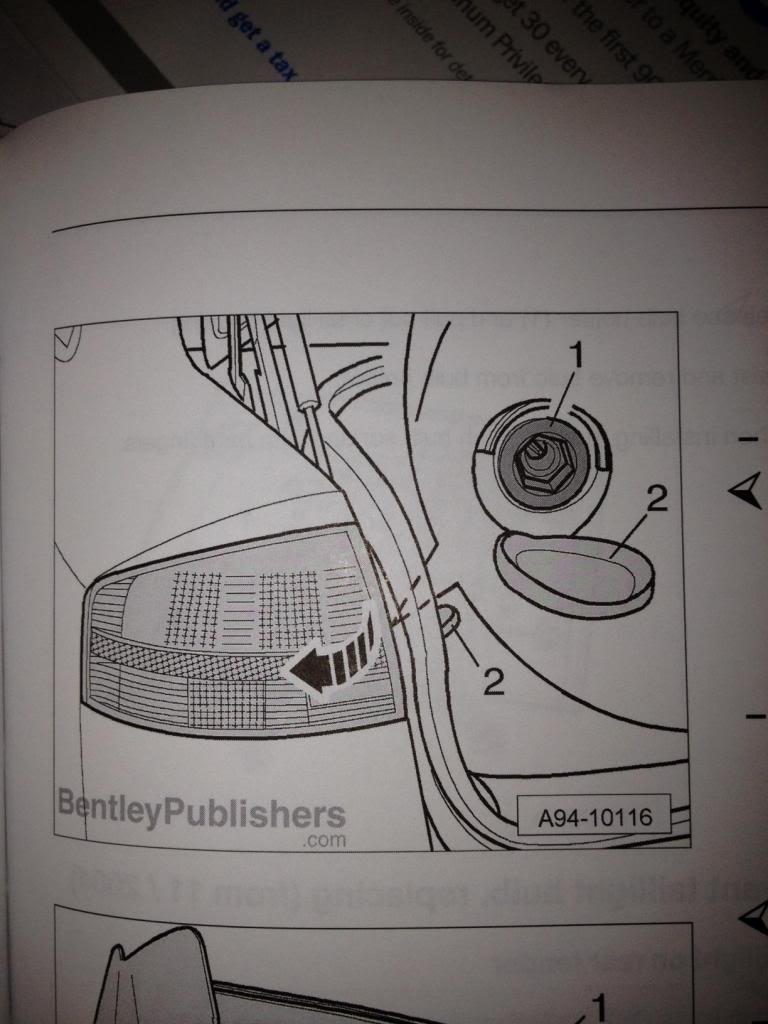
For further help, here's a photo illustration of the "Swivel outwards to release" technique.