Question of navigation antenna for 2005 Audi A6
 04-07-2012, 06:05 AM
#1
AudiWorld Member
Thread Starter

Join Date: Dec 2008
Posts: 284
Likes: 0
Received 0 Likes
on
0 Posts
What is the cheapest source for Navigation Antenna for 2005 Audi A6.
The part # is 4F5035503HGRU. I believe the antenna is not getting any
satellites as my x had this car and she went through commercial car washes
and looks like water may have leaked inside the antenna.
Th best price I got was $293.88 with $15 shipping. Is it worth getting a used one?
This antenna has to be painted. Has anyone been able to repair non-working
antenna? Wondering, if it is worth fixing this?
I do plan to keep the car.
 04-07-2012, 10:27 AM
#2
AudiWorld Member

Join Date: Mar 2010
Location: USAF in Germany
Posts: 136
Likes: 0
Received 0 Likes
on
0 Posts
I had to swap mine on my '05. Paint not required, just swap the cover. That price is better than what I paid. Pull rear pillar covers then panel above rear window to drop the headliner a bit. One torx bit holds the antenna on. Routing the wiring and getting to it are the hard part of the repair.
04-07-2012, 12:47 PM
#3
AudiWorld Senior Member
I had to swap mine on my '05. Paint not required, just swap the cover. That price is better than what I paid. Pull rear pillar covers then panel above rear window to drop the headliner a bit. One torx bit holds the antenna on. Routing the wiring and getting to it are the hard part of the repair.
<TABLE cellSpacing=0 cellPadding=0 width="100%"><TBODY><TR><TD class=spalte-text><TABLE class="cc abstand-kap einzug-standard"><TBODY><TR><TD class=titel-kap>Removing and installing roof aerial -R216-, saloon</TD></TR></TBODY></TABLE><TABLE class="cc einzug-standard abstand-standard "><TBODY><TR><TD>To remove roof aerial -R216-, remove D-pillar trims and headliner.</TD></TR></TBODY></TABLE><TABLE class="cc einzug-standard abstand-standard "><TBODY><TR><TD class=einzug-liste>� </TD><TD>Switch off all electrical equipment.</TD></TR></TBODY></TABLE><TABLE class="cc einzug-standard abstand-standard "><TBODY><TR><TD class=einzug-liste>� </TD><TD>Remove ignition key.</TD></TR></TBODY></TABLE><TABLE class="cc einzug-standard abstand-standard absatz-hervor"><TBODY><TR><TD>Removing</TD></TR></TBODY></TABLE><TABLE class="cc einzug-standard abstand-standard "><TBODY><TR><TD class=einzug-liste>� </TD><TD>Remove roof end trim → </TD></TR></TBODY></TABLE><TABLE class="cc einzug-standard abstand-standard "><TBODY><TR><TD class=einzug-liste>� </TD><TD>Remove D-pillar trim (left and right) </TD></TR></TBODY></TABLE><TABLE class="cc einzug-standard abstand-standard "><TBODY><TR><TD class=einzug-liste>� </TD><TD>Remove headliner completely and lay it down on dash panel.</TD></TR></TBODY></TABLE></TD><TD class=spalte-pfeil></TD><TD class=spalte-marg></TD></TR></TBODY></TABLE><TABLE cellSpacing=0 cellPadding=0 width="100%"><TBODY><TR><TD class=spalte-text><TABLE class="cc einzug-standard abstand-standard "><TBODY><TR><TD class=einzug-liste>� </TD><TD>Unclip cable clips -2- and -6-.</TD></TR></TBODY></TABLE></TD></TR></TBODY></TABLE>

<TABLE cellSpacing=0 cellPadding=0 width="100%"><TBODY><TR><TD class=spalte-text><TABLE class="cc einzug-standard abstand-standard "><TBODY><TR><TD class=einzug-liste>� </TD><TD>Unplug connector -1- at D-pillar (right-side).</TD></TR></TBODY></TABLE>

<TABLE class="cc einzug-standard abstand-standard "><TBODY><TR><TD class=einzug-liste>� </TD><TD>Unplug connector -1- at D-pillar (left-side).</TD></TR></TBODY></TABLE>
<TABLE cellSpacing=0 cellPadding=0 width="100%"><TBODY><TR><TD class=spalte-text><TABLE class="cc einzug-standard abstand-standard "><TBODY><TR><TD class=einzug-liste>� </TD><TD>Unscrew nut -4- (6 Nm).</TD></TR></TBODY></TABLE><TABLE class="cc einzug-standard abstand-standard "><TBODY><TR><TD class=einzug-liste>� </TD><TD>Lift roof aerial -R216--1- off roof.</TD></TR></TBODY></TABLE>

Installing
<TABLE cellSpacing=0 cellPadding=0 width="100%"><TBODY><TR><TD class=spalte-text><TABLE class="cc einzug-standard abstand-standard "><TBODY><TR><TD class=einzug-liste>� </TD><TD>Guide in aerial wiring and carefully fit roof aerial -R216--1- onto roof.</TD></TR></TBODY></TABLE>

<TABLE cellSpacing=0 cellPadding=0 width="100%"><TBODY><TR><TD class=spalte-text><TABLE class="cc einzug-standard abstand-standard "><TBODY><TR><TD class=einzug-liste>� </TD><TD>Make sure that the aerial wiring -3- is fitted in the grooves -arrows- on the aerial base and securing nut -2- so that it does not become pinched or crimped.</TD></TR></TBODY></TABLE><TABLE class="cc einzug-standard abstand-standard "><TBODY><TR><TD class=einzug-liste>� </TD><TD>Tighten nut evenly to 6 Nm.</TD></TR></TBODY></TABLE><TABLE class="cc einzug-standard abstand-standard "><TBODY><TR><TD class=einzug-liste>� </TD><TD>Make sure that the roof aerial -R216- is fitted evenly on the roof.</TD></TR></TBODY></TABLE><TABLE class="cc einzug-standard abstand-standard "><TBODY><TR><TD class=einzug-liste>� </TD><TD>Secure aerial wiring and plug in connectors.</TD></TR></TBODY></TABLE><TABLE class="cc einzug-standard abstand-standard "><TBODY><TR><TD class=einzug-liste>� </TD><TD>Perform further installation in reverse sequence.</TD></TR></TBODY></TABLE>
 </TD></TR></TBODY></TABLE>
</TD></TR></TBODY></TABLE>
</TD></TR></TBODY></TABLE>
</TD></TR></TBODY></TABLE>
<TABLE cellSpacing=0 cellPadding=0 width="100%"><TBODY><TR><TD class=spalte-text><TABLE class="cc abstand-kap einzug-standard"><TBODY><TR><TD class=titel-kap>Removing and installing roof aerial -R216-, Avant</TD></TR></TBODY></TABLE><TABLE class="cc einzug-standard abstand-standard "><TBODY><TR><TD class=einzug-liste>� </TD><TD>Switch off all electrical equipment.</TD></TR></TBODY></TABLE><TABLE class="cc einzug-standard abstand-standard "><TBODY><TR><TD class=einzug-liste>� </TD><TD>Remove ignition key.</TD></TR></TBODY></TABLE><TABLE class="cc einzug-standard abstand-standard absatz-hervor"><TBODY><TR><TD>Removing</TD></TR></TBODY></TABLE><TABLE class="cc einzug-standard abstand-standard "><TBODY><TR><TD class=einzug-liste>� </TD><TD>Remove roof end trim → </TD></TR></TBODY></TABLE></TD><TD class=spalte-pfeil></TD><TD class=spalte-marg></TD></TR></TBODY></TABLE><TABLE cellSpacing=0 cellPadding=0 width="100%"><TBODY><TR><TD class=spalte-text><TABLE class="cc einzug-standard abstand-standard "><TBODY><TR><TD class=einzug-liste>� </TD><TD>Unplug connectors in retainers -2- and -4-.</TD></TR></TBODY></TABLE><TABLE class="cc einzug-standard abstand-standard "><TBODY><TR><TD class=einzug-liste>� </TD><TD>Unscrew nut -3- (6 Nm) and unclip aerial wiring.</TD></TR></TBODY></TABLE><TABLE class="cc einzug-standard abstand-standard "><TBODY><TR><TD class=einzug-liste>� </TD><TD>Lift roof aerial -R216- off roof.</TD></TR></TBODY></TABLE><TABLE class="cc einzug-standard abstand-standard absatz-hervor"><TBODY><TR><TD>Installing</TD></TR></TBODY></TABLE><TABLE class="cc einzug-standard abstand-standard "><TBODY><TR><TD class=einzug-liste>� </TD><TD>Guide in aerial wiring and carefully fit roof aerial -R216- onto roof.</TD></TR></TBODY></TABLE>

<TABLE cellSpacing=0 cellPadding=0 width="100%"><TBODY><TR><TD class=spalte-text><TABLE class="cc einzug-standard abstand-standard "><TBODY><TR><TD class=einzug-liste>� </TD><TD>Make sure that the aerial wiring -3- is fitted in the grooves -arrows- on the aerial base and securing nut -2- so that it does not become pinched or crimped.</TD></TR></TBODY></TABLE><TABLE class="cc einzug-standard abstand-standard "><TBODY><TR><TD class=einzug-liste>� </TD><TD>Tighten nut evenly to 6 Nm.</TD></TR></TBODY></TABLE>

<TABLE cellSpacing=0 cellPadding=0 width="100%"><TBODY><TR><TD class=spalte-text><TABLE class="cc einzug-standard abstand-standard "><TBODY><TR><TD class=einzug-liste>� </TD><TD>Make sure that the roof aerial -R216- is fitted evenly on the roof.</TD></TR></TBODY></TABLE><TABLE class="cc einzug-standard abstand-standard "><TBODY><TR><TD class=einzug-liste>� </TD><TD>Secure aerial wiring and clip aerial wiring into retainers -2- and -4-.</TD></TR></TBODY></TABLE><TABLE class="cc einzug-standard abstand-standard "><TBODY><TR><TD class=einzug-liste>� </TD><TD>Plug in connectors.</TD></TR></TBODY></TABLE><TABLE class="cc einzug-standard abstand-standard "><TBODY><TR><TD class=einzug-liste>� </TD><TD>Perform further installation in reverse sequence.</TD></TR></TBODY></TABLE>
 </TD></TR></TBODY></TABLE>
</TD></TR></TBODY></TABLE>
</TD></TR></TBODY></TABLE>
Last edited by royclark; 04-09-2012 at 11:16 AM.
04-07-2012, 05:01 PM
#4
AudiWorld Junior Member

Join Date: Jul 2008
Posts: 40
Likes: 0
Received 0 Likes
on
0 Posts
the cheapest way is to buy a $5 universal GPS antenna, plug it the Navegation DVD drive in the trunk(replace the defect OEM antenna), the antenna can be placed anywhere in the rear window shelf. it doesn't have to be on the top of shelf, you can hide it underneath.
04-08-2012, 02:28 AM
#5
AudiWorld Senior Member
Join Date: Jun 2009
Location: Atlantic City Metro Area
Posts: 792
Likes: 0
Received 2 Likes
on
2 Posts
I am dealing w the same issue.
Seems too much to repair... Better to just swap in a used one and hopefully it buys us enough good use.
There is a lot to know.
Our antennas are multi function so if u ONLY use NAV then u could get a universal unit but if this is like satellite radio then it would require an adaptor aswell to plug into under the roof liner. Not sure if it can be plugged directly into the NAV unit and if so would it throw a code.....for sat radio mod it would cost about $10 for adaptor 20- 30 dollars antenna ..used... Then shipping... Im assume similar for nav mod. U would have to retrofit/ piggy back the unit on roof or place on back deck. But if u also use am/fm and/or sat radio then the original antenna will likely continue to degrade and eventually u may end up looking to replace antenna again for the other uses.
The antenna of the 2005 is larger in size then current units and use 4 plugs. i think we can use any antenna from the years aprox 2004-2007 from any VAG (not sure if benz work) car as long as car was equipped w nav n satellite radio. There's too many part #s to list. We can use either size but I believe they must have 4 plugs. My .02 � The newer smaller size antennas are better built.
The diagrams above show the newer unit but removal of larger unit are similar. Our cars have 2 holes on the roof so if u get a smaller unit the second hole would have to be blocked/taped up to prevent water into veh. It's a TORX 15 that removes the antenna from the inside and to access it should require dropping at least the back half of roof liner.
U could swap out the guts like nedrager said but Audi does not recommend this (there is a TSB) because it's the cover that cracks and That's how the moisture gets in. Can't say for sure if it's car wash's fault or weak plastic design. I found that my 2 rear screws were not held in place tight because the plastic gave way and cracked. If u r lucky like nedrager and your plastic cover is not damaged then u can reuse it but the risk is it may crack sooner then later and u will have moisture damage again.
I have a few pics... I'll try to add links soon
Last edited by MainlandMig; 04-08-2012 at 12:03 PM.
04-08-2012, 06:44 AM
#6
AudiWorld Member
Thread Starter
Join Date: Dec 2008
Posts: 284
Likes: 0
Received 0 Likes
on
0 Posts
Yes, if I was going to buy new one, I would hate that it fails again as I used the old cover. I am re-thinking, if it is worth going through the headache of installing a new one.
I do not subscribe to Satellite radio and that leaves use of the Navigation feature.
I am using Garmin right now. So, actually, there is no need for the antenna per say, other than it would be nice, if it was working.
I have fixed all the issues with the car, replaced emergency brake module,
replaced transmission fluid, all other fluids except differential fluids,
replaced both xenon headlights, replaced spark plugs/fuel filter, detailing the car inside/out, etc.
Installed Audi LEDs in place of the fog lights and put a modified black aluminum grill to cover the hole. Car looks pretty good except I have to fix some curb rash on the wheels.
Car runs perfect except for the navigation.
04-08-2012, 07:29 AM
#7
AudiWorld Member
Join Date: Mar 2010
Location: USAF in Germany
Posts: 136
Likes: 0
Received 0 Likes
on
0 Posts
@royclark
That antenna is not what I had on my '05 A6 (US spec). The antenna I have is held on with a torx screw. Otherwise that's all the pain you have to got through to change one.
That antenna is not what I had on my '05 A6 (US spec). The antenna I have is held on with a torx screw. Otherwise that's all the pain you have to got through to change one.
Trending Topics
04-08-2012, 12:19 PM
#8
AudiWorld Senior Member
Join Date: Jun 2009
Location: Atlantic City Metro Area
Posts: 792
Likes: 0
Received 2 Likes
on
2 Posts
Yes, if I was going to buy new one, I would hate that it fails again as I used the old cover. I am re-thinking, if it is worth going through the headache of installing a new one.
I do not subscribe to Satellite radio and that leaves use of the Navigation feature.
I am using Garmin right now. So, actually, there is no need for the antenna per say, other than it would be nice, if it was working.
I do not subscribe to Satellite radio and that leaves use of the Navigation feature.
I am using Garmin right now. So, actually, there is no need for the antenna per say, other than it would be nice, if it was working.
well a white antenna just sold on ebay for $75 ..u could have easily sanded it down and paint matched it to veh color
now are they easy to find this cheap?? no u have to wait it out and get lucky
jeffry on this forum has a NEW untouched unpainted OEM antenna cheap.. he just used the extra cable that came in the box
it is just nav and not sat radio so if the car ever needs sat radio u would have to deal with that
if u go for the full function solution from ebay then lets try not to outbid each other ...i use the same SN .. i will step aside and wait for another
04-09-2012, 05:46 AM
#9
AudiWorld Member
Thread Starter
Join Date: Dec 2008
Posts: 284
Likes: 0
Received 0 Likes
on
0 Posts
I am wondering if this roof navigation/satellite antenna has a high failure rate as none of the dealers seem to carry this part in stock and they all have to order it. Does anyone knows how to fix the electronics of the antenna? I think one can take off the plastic shell and replace with the one from the non-working antenna.
I would hate to do all the work with a used antenna and it craps out.
Is there a way to pre-test the used antenna without taking all the liner out etc.
I would hate to do all the work with a used antenna and it craps out.
Is there a way to pre-test the used antenna without taking all the liner out etc.
04-09-2012, 11:25 AM
#10
AudiWorld Senior Member
<TABLE cellSpacing=0 cellPadding=0 width="100%"><TBODY><TR><TD class=spalte-text><TABLE class="cc abstand-h-kap einzug-standard"><TBODY><TR><TD class=titel-h-kap></TD></TR></TBODY></TABLE><TABLE class="cc einzug-standard abstand-standard "><TBODY><TR><TD>A repair method has been developed for repairing aerial wires. Instead of a complete aerial wire, connecting wires of different lengths and various adapter wires are now available as replacement parts.</TD></TR></TBODY></TABLE><TABLE class="cc einzug-standard abstand-standard "><TBODY><TR><TD></TD></TR></TBODY></TABLE> Note
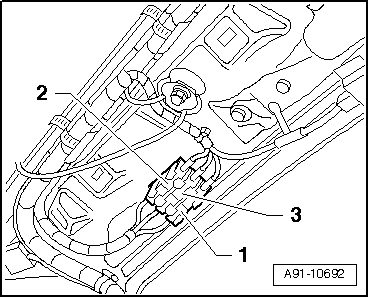
<TABLE class="cc abstand-liste-erster einzug-standard hinweis-rumpf"><TBODY><TR><TD class=einzug-liste>t </TD><TD>Do not repair aerial wires. The wiring must be renewed using connecting wires and adapter wires (available as genuine replacement parts).</TD></TR></TBODY></TABLE><TABLE class="cc abstand-liste einzug-standard hinweis-rumpf"><TBODY><TR><TD class=einzug-liste>t </TD><TD>These genuine replacement parts are suitable for all wire cross-sections and aerial wires which have to be renewed.</TD></TR></TBODY></TABLE><TABLE class="cc abstand-liste einzug-standard hinweis-rumpf"><TBODY><TR><TD class=einzug-liste>t </TD><TD>It is not possible to renew individual aerial connectors during repair work.</TD></TR></TBODY></TABLE><TABLE class="cc abstand-liste einzug-standard hinweis-rumpf"><TBODY><TR><TD class=einzug-liste>t </TD><TD>The replacement wires can be used for all previously fitted wiring cross-sections on all Audi models.</TD></TR></TBODY></TABLE><TABLE class="cc abstand-liste einzug-standard hinweis-rumpf"><TBODY><TR><TD class=einzug-liste>t </TD><TD>All adapter wires and connecting wires are suitable for all transmission and reception signals.</TD></TR></TBODY></TABLE><TABLE class="cc abstand-liste einzug-standard hinweis-rumpf"><TBODY><TR><TD class=einzug-liste>t </TD><TD>The repair method can also be used for testing and service installation purposes (e.g. retrofitting).</TD></TR></TBODY></TABLE><TABLE class="cc abstand-standard einzug-standard"><TBODY><TR><TD class=wz-liste-kopf>Special tools and workshop equipment required</TD></TR></TBODY></TABLE></TD><TD class=spalte-pfeil> </TD><TD class=spalte-marg> </TD></TR></TBODY></TABLE><TABLE cellSpacing=0 cellPadding=0 width="100%"><TBODY><TR><TD class=spalte-text><TABLE class="cc abstand-standard einzug-standard "><TBODY><TR><TD class=einzug-liste>t </TD><TD>-1- Adapter wire for connection to radio; length: approx. 30 cm</TD></TR></TBODY></TABLE><TABLE class="cc abstand-liste einzug-standard "><TBODY><TR><TD class=einzug-liste>t </TD><TD>-2- Connecting wire; various lengths available</TD></TR></TBODY></TABLE><TABLE class="cc abstand-liste einzug-standard "><TBODY><TR><TD class=einzug-liste>t </TD><TD>-3- Adapter wire for connection to aerial; length: approx. 30 cm</TD></TR></TBODY></TABLE><TABLE class="cc einzug-standard abstand-standard absatz-hervor"><TBODY><TR><TD>Procedure</TD></TR></TBODY></TABLE><TABLE class="cc einzug-standard abstand-standard "><TBODY><TR><TD>Example: Aerial wire from radio to aerial defective</TD></TR></TBODY></TABLE><TABLE class="cc einzug-standard abstand-standard "><TBODY><TR><TD class=einzug-liste>� </TD><TD>Unplug connectors of defective aerial wire from units.</TD></TR></TBODY></TABLE><TABLE class="cc einzug-standard abstand-standard "><TBODY><TR><TD class=einzug-liste>� </TD><TD>Determine routing of defective aerial wire in vehicle and measure out overall length of aerial connection to be replaced in vehicle.</TD></TR></TBODY></TABLE></TD></TR></TBODY></TABLE>

<TABLE cellSpacing=0 cellPadding=0 width="100%"><TBODY><TR><TD class=spalte-text><TABLE class="cc abstand-standard einzug-standard "><TBODY><TR><TD class=einzug-liste>l </TD><TD>Total length of aerial connection = length of required adapter wires -1 and 3- plus connecting wire -2-.</TD></TR></TBODY></TABLE><TABLE class="cc einzug-standard abstand-standard "><TBODY><TR><TD class=einzug-liste>� </TD><TD>Subtract 60 cm from total length of aerial connection measured to calculate required length of connecting wire needed.</TD></TR></TBODY></TABLE><TABLE class="cc einzug-standard abstand-standard "><TBODY><TR><TD class=einzug-liste>� </TD><TD>Obtain necessary adapter wires and connecting wire (with calculated length) as genuine replacement parts</TD></TR></TBODY></TABLE><TABLE class="cc einzug-standard abstand-standard "><TBODY><TR><TD class=einzug-liste>� </TD><TD>Cut connectors off defective aerial wire.</TD></TR></TBODY></TABLE><TABLE class="cc abstand-standard einzug-standard "><TBODY><TR><TD class=einzug-liste>l </TD><TD>Leave rest of defective aerial wire in vehicle.</TD></TR></TBODY></TABLE><TABLE class="cc einzug-standard abstand-standard "><TBODY><TR><TD class=einzug-liste>� </TD><TD>Connect adapter wires to units in vehicle.</TD></TR></TBODY></TABLE><TABLE class="cc einzug-standard abstand-standard "><TBODY><TR><TD class=einzug-liste>� </TD><TD>Fit connectors with a piece of foam sheathing to prevent rattling noise.</TD></TR></TBODY></TABLE><TABLE class="cc einzug-standard abstand-standard "><TBODY><TR><TD class=einzug-liste>� </TD><TD>Lay and secure connecting wire parallel to old aerial wire.</TD></TR></TBODY></TABLE>Note
<TABLE class="cc abstand-liste-erster einzug-standard hinweis-rumpf"><TBODY><TR><TD>Aerial wires must not be kinked or bent excessively. Bending radius must not be less than 50 mm.</TD></TR></TBODY></TABLE><TABLE class="cc einzug-standard abstand-standard "><TBODY><TR><TD class=einzug-liste>� </TD><TD>Attach connecting wire to adapter wires.</TD></TR></TBODY></TABLE><TABLE class="cc einzug-standard abstand-standard "><TBODY><TR><TD class=einzug-liste>� </TD><TD>To prevent rattling noises, apply a suitable piece of foam sheathing to aerial connectors.</TD></TR></TBODY></TABLE><TABLE class="cc einzug-standard abstand-standard "><TBODY><TR><TD class=einzug-liste>� </TD><TD>Check operation.</TD></TR></TBODY></TABLE></TD></TR></TBODY></TABLE>
<TABLE class="cc abstand-liste-erster einzug-standard hinweis-rumpf"><TBODY><TR><TD class=einzug-liste>t </TD><TD>Do not repair aerial wires. The wiring must be renewed using connecting wires and adapter wires (available as genuine replacement parts).</TD></TR></TBODY></TABLE><TABLE class="cc abstand-liste einzug-standard hinweis-rumpf"><TBODY><TR><TD class=einzug-liste>t </TD><TD>These genuine replacement parts are suitable for all wire cross-sections and aerial wires which have to be renewed.</TD></TR></TBODY></TABLE><TABLE class="cc abstand-liste einzug-standard hinweis-rumpf"><TBODY><TR><TD class=einzug-liste>t </TD><TD>It is not possible to renew individual aerial connectors during repair work.</TD></TR></TBODY></TABLE><TABLE class="cc abstand-liste einzug-standard hinweis-rumpf"><TBODY><TR><TD class=einzug-liste>t </TD><TD>The replacement wires can be used for all previously fitted wiring cross-sections on all Audi models.</TD></TR></TBODY></TABLE><TABLE class="cc abstand-liste einzug-standard hinweis-rumpf"><TBODY><TR><TD class=einzug-liste>t </TD><TD>All adapter wires and connecting wires are suitable for all transmission and reception signals.</TD></TR></TBODY></TABLE><TABLE class="cc abstand-liste einzug-standard hinweis-rumpf"><TBODY><TR><TD class=einzug-liste>t </TD><TD>The repair method can also be used for testing and service installation purposes (e.g. retrofitting).</TD></TR></TBODY></TABLE><TABLE class="cc abstand-standard einzug-standard"><TBODY><TR><TD class=wz-liste-kopf>Special tools and workshop equipment required</TD></TR></TBODY></TABLE></TD><TD class=spalte-pfeil> </TD><TD class=spalte-marg> </TD></TR></TBODY></TABLE><TABLE cellSpacing=0 cellPadding=0 width="100%"><TBODY><TR><TD class=spalte-text><TABLE class="cc abstand-standard einzug-standard "><TBODY><TR><TD class=einzug-liste>t </TD><TD>-1- Adapter wire for connection to radio; length: approx. 30 cm</TD></TR></TBODY></TABLE><TABLE class="cc abstand-liste einzug-standard "><TBODY><TR><TD class=einzug-liste>t </TD><TD>-2- Connecting wire; various lengths available</TD></TR></TBODY></TABLE><TABLE class="cc abstand-liste einzug-standard "><TBODY><TR><TD class=einzug-liste>t </TD><TD>-3- Adapter wire for connection to aerial; length: approx. 30 cm</TD></TR></TBODY></TABLE><TABLE class="cc einzug-standard abstand-standard absatz-hervor"><TBODY><TR><TD>Procedure</TD></TR></TBODY></TABLE><TABLE class="cc einzug-standard abstand-standard "><TBODY><TR><TD>Example: Aerial wire from radio to aerial defective</TD></TR></TBODY></TABLE><TABLE class="cc einzug-standard abstand-standard "><TBODY><TR><TD class=einzug-liste>� </TD><TD>Unplug connectors of defective aerial wire from units.</TD></TR></TBODY></TABLE><TABLE class="cc einzug-standard abstand-standard "><TBODY><TR><TD class=einzug-liste>� </TD><TD>Determine routing of defective aerial wire in vehicle and measure out overall length of aerial connection to be replaced in vehicle.</TD></TR></TBODY></TABLE></TD></TR></TBODY></TABLE>
<TABLE cellSpacing=0 cellPadding=0 width="100%"><TBODY><TR><TD class=spalte-text><TABLE class="cc abstand-standard einzug-standard "><TBODY><TR><TD class=einzug-liste>l </TD><TD>Total length of aerial connection = length of required adapter wires -1 and 3- plus connecting wire -2-.</TD></TR></TBODY></TABLE><TABLE class="cc einzug-standard abstand-standard "><TBODY><TR><TD class=einzug-liste>� </TD><TD>Subtract 60 cm from total length of aerial connection measured to calculate required length of connecting wire needed.</TD></TR></TBODY></TABLE><TABLE class="cc einzug-standard abstand-standard "><TBODY><TR><TD class=einzug-liste>� </TD><TD>Obtain necessary adapter wires and connecting wire (with calculated length) as genuine replacement parts</TD></TR></TBODY></TABLE><TABLE class="cc einzug-standard abstand-standard "><TBODY><TR><TD class=einzug-liste>� </TD><TD>Cut connectors off defective aerial wire.</TD></TR></TBODY></TABLE><TABLE class="cc abstand-standard einzug-standard "><TBODY><TR><TD class=einzug-liste>l </TD><TD>Leave rest of defective aerial wire in vehicle.</TD></TR></TBODY></TABLE><TABLE class="cc einzug-standard abstand-standard "><TBODY><TR><TD class=einzug-liste>� </TD><TD>Connect adapter wires to units in vehicle.</TD></TR></TBODY></TABLE><TABLE class="cc einzug-standard abstand-standard "><TBODY><TR><TD class=einzug-liste>� </TD><TD>Fit connectors with a piece of foam sheathing to prevent rattling noise.</TD></TR></TBODY></TABLE><TABLE class="cc einzug-standard abstand-standard "><TBODY><TR><TD class=einzug-liste>� </TD><TD>Lay and secure connecting wire parallel to old aerial wire.</TD></TR></TBODY></TABLE>Note
<TABLE class="cc abstand-liste-erster einzug-standard hinweis-rumpf"><TBODY><TR><TD>Aerial wires must not be kinked or bent excessively. Bending radius must not be less than 50 mm.</TD></TR></TBODY></TABLE><TABLE class="cc einzug-standard abstand-standard "><TBODY><TR><TD class=einzug-liste>� </TD><TD>Attach connecting wire to adapter wires.</TD></TR></TBODY></TABLE><TABLE class="cc einzug-standard abstand-standard "><TBODY><TR><TD class=einzug-liste>� </TD><TD>To prevent rattling noises, apply a suitable piece of foam sheathing to aerial connectors.</TD></TR></TBODY></TABLE><TABLE class="cc einzug-standard abstand-standard "><TBODY><TR><TD class=einzug-liste>� </TD><TD>Check operation.</TD></TR></TBODY></TABLE></TD></TR></TBODY></TABLE>