Seat belt clip gone into housing, cant use, possible need to remove rear seat, how??
 05-09-2012, 01:59 PM
#1
AudiWorld Newcomer
Thread Starter

Join Date: May 2012
Posts: 3
Likes: 0
Received 0 Likes
on
0 Posts
hi,
The male/metal part of my seat belt has somehow got behind the housing so i cannot strap my child seat into the car. I need to get under the housing (marked 'a' in picture) Panel b can only be taken off if I remove the vertical part of the rear seat, Question: how do I get access to under the housing (a) Do i need to remove seat, if so how do i remove seat, do the receptors for the headrests hold that part fo rear seat in place??

thanks
Tom
Make: Audi
Model: A6
Year: 2005
The male/metal part of my seat belt has somehow got behind the housing so i cannot strap my child seat into the car. I need to get under the housing (marked 'a' in picture) Panel b can only be taken off if I remove the vertical part of the rear seat, Question: how do I get access to under the housing (a) Do i need to remove seat, if so how do i remove seat, do the receptors for the headrests hold that part fo rear seat in place??
thanks
Tom
Make: Audi
Model: A6
Year: 2005

 05-09-2012, 11:32 PM
#4
AudiWorld Newcomer

Join Date: Aug 2009
Posts: 2
Likes: 0
Received 0 Likes
on
0 Posts
happened to me once since son likes to play with the belt. I used a telescoping pen magnet like this to grab the clip and pull it out.
http://www.amazon.com/Carica-Telesco.../dp/B0002JMI9A
http://www.amazon.com/Carica-Telesco.../dp/B0002JMI9A
05-10-2012, 02:14 AM
#5
AudiWorld Newcomer
Thread Starter
Join Date: May 2012
Posts: 3
Likes: 0
Received 0 Likes
on
0 Posts
happened to me once since son likes to play with the belt. I used a telescoping pen magnet like this to grab the clip and pull it out.
http://www.amazon.com/Carica-Telesco.../dp/B0002JMI9A
http://www.amazon.com/Carica-Telesco.../dp/B0002JMI9A
 05-10-2012, 10:20 AM
#7
AudiWorld Senior Member
hi,
The male/metal part of my seat belt has somehow got behind the housing so i cannot strap my child seat into the car. I need to get under the housing (marked 'a' in picture) Panel b can only be taken off if I remove the vertical part of the rear seat, Question: how do I get access to under the housing (a) Do i need to remove seat, if so how do i remove seat, do the receptors for the headrests hold that part fo rear seat in place??
thanks
Tom
Make: Audi
Model: A6
Year: 2005
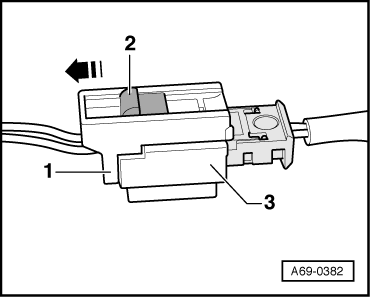
<TABLE class="cc abstand-standard erlaeutrg-explo"><TBODY><TR><TD class=einzug-nummer>1 - </TD><TD>Side padding</TD></TR></TBODY></TABLE>
<TABLE class="cc abstand-standard einzug-explo "><TBODY><TR><TD class=einzug-liste>t </TD><TD>Removing</TD></TR></TBODY></TABLE>
<TABLE class="cc einzug-explo abstand-explo "><TBODY><TR><TD class=einzug-liste>� </TD><TD>Remove rear seat bench</TD></TR></TBODY></TABLE>
<TABLE class="cc einzug-explo abstand-explo "><TBODY><TR><TD class=einzug-liste>� </TD><TD>Unscrew bolt -6-.</TD></TR></TBODY></TABLE>
<TABLE class="cc einzug-explo abstand-explo "><TBODY><TR><TD class=einzug-liste>� </TD><TD>On vehicles with side airbag -8- unplug electrical connector -7-</TD></TR></TBODY></TABLE>
<TABLE class="cc einzug-explo abstand-explo "><TBODY><TR><TD class=einzug-liste>� </TD><TD>Unfasten nut -4-.</TD></TR></TBODY></TABLE>
<TABLE class="cc einzug-explo abstand-explo "><TBODY><TR><TD class=einzug-liste>� </TD><TD>Unscrew and remove striker pin -5- together with washer -3- and dished washer -2-.</TD></TR></TBODY></TABLE>
<TABLE class="cc abstand-standard einzug-explo "><TBODY><TR><TD class=einzug-liste>t </TD><TD>Installing</TD></TR></TBODY></TABLE>
<TABLE class="cc einzug-explo abstand-explo "><TBODY><TR><TD>Install in reverse order of removal. Note the following:</TD></TR></TBODY></TABLE>
<TABLE class="cc einzug-explo abstand-explo "><TBODY><TR><TD class=einzug-liste>� </TD><TD>Adjust striker pin -5- and tighten nut -4-.</TD></TR></TBODY></TABLE>
<TABLE class="cc abstand-standard erlaeutrg-explo"><TBODY><TR><TD class=einzug-nummer>2 - </TD><TD>Dished washer</TD></TR></TBODY></TABLE>
<TABLE class="cc abstand-standard erlaeutrg-explo"><TBODY><TR><TD class=einzug-nummer>3 - </TD><TD>Washer</TD></TR></TBODY></TABLE>
<TABLE class="cc abstand-standard erlaeutrg-explo"><TBODY><TR><TD class=einzug-nummer>4 - </TD><TD>Nut</TD></TR></TBODY></TABLE>
<TABLE class="cc einzug-explo abstand-explo "><TBODY><TR><TD class=einzug-liste>q </TD><TD>Tightening torque: 55 Nm </TD></TR></TBODY></TABLE>
<TABLE class="cc abstand-standard erlaeutrg-explo"><TBODY><TR><TD class=einzug-nummer>5 - </TD><TD>Striker pin</TD></TR></TBODY></TABLE>
<TABLE class="cc abstand-standard erlaeutrg-explo"><TBODY><TR><TD class=einzug-nummer>6 - </TD><TD>Bolt</TD></TR></TBODY></TABLE>
<TABLE class="cc einzug-explo abstand-explo "><TBODY><TR><TD class=einzug-liste>q </TD><TD>Tightening torque: 8 Nm</TD></TR></TBODY></TABLE>
<TABLE class="cc abstand-standard erlaeutrg-explo"><TBODY><TR><TD class=einzug-nummer>7 - </TD><TD>Connector for side airbag</TD></TR></TBODY></TABLE>
<TABLE class="cc abstand-standard erlaeutrg-explo"><TBODY><TR><TD class=einzug-nummer>8 - </TD><TD>Side airbag</TD></TR></TBODY></TABLE>

<TABLE class="cc bild-titel einzug-standard abstand-standard"><TBODY><TR><TD>Disconnecting connector for side airbag</TD></TR></TBODY></TABLE><TABLE class="cc einzug-standard abstand-standard "><TBODY><TR><TD class=einzug-liste>� </TD><TD>Press retaining tab -2- of connector for side airbag -1- and unplug connector from mating piece -3-.</TD></TR></TBODY></TABLE>
Removing and installing seat bench

<TABLE class="cc einzug-standard abstand-standard absatz-hervor"><TBODY><TR><TD>Removing</TD></TR></TBODY></TABLE><TABLE class="cc einzug-standard abstand-standard "><TBODY><TR><TD class=einzug-liste>� </TD><TD>Pull front edge of seat bench out of retainers -1- (left and right).</TD></TR></TBODY></TABLE><TABLE class="cc einzug-standard abstand-standard "><TBODY><TR><TD class=einzug-liste>� </TD><TD>Disengage seat bench from retainers -4- (left and right) by pushing it firmly towards the rear.</TD></TR></TBODY></TABLE><TABLE class="cc einzug-standard abstand-standard "><TBODY><TR><TD class=einzug-liste>� </TD><TD>On vehicles with seat heating raise the seat bench high enough to be able to unplug the electrical connectors.</TD></TR></TBODY></TABLE><TABLE class="cc einzug-standard abstand-standard "><TBODY><TR><TD class=einzug-liste>� </TD><TD>Take electrical connector for side airbag out of groove</TD></TR></TBODY></TABLE><TABLE class="cc einzug-standard abstand-standard "><TBODY><TR><TD class=einzug-liste>� </TD><TD>Take seat bench out of vehicle.</TD></TR></TBODY></TABLE><TABLE class="cc einzug-standard abstand-standard absatz-hervor"><TBODY><TR><TD>Installing</TD></TR></TBODY></TABLE><TABLE class="cc einzug-standard abstand-standard "><TBODY><TR><TD>Installation is carried out in the reverse order, note the following:</TD></TR></TBODY></TABLE>
Caution<TABLE class="cc einzug-standard abstand-liste-erster achtung-rumpf"><TBODY><TR><TD>The retainers must be renewed whenever you have removed the rear seat bench</TD></TR></TBODY></TABLE>
Side airbag connector
WARNING<TABLE class="cc einzug-standard abstand-liste-erster achtung-rumpf"><TBODY><TR><TD>On vehicles with side airbags please observe relevant safety regulations →
<TABLE cellSpacing=0 cellPadding=0 width="100%"><TBODY><TR><TD class=spalte-text><TABLE class="cc abstand-kap einzug-standard"><TBODY><TR><TD class=titel-kap>Additional safety regulations for side airbags</TD></TR></TBODY></TABLE><TABLE class="cc abstand-standard einzug-standard "><TBODY><TR><TD class=einzug-liste>t </TD><TD>We recommend using genuine seat covers (same as original equipment).</TD></TR></TBODY></TABLE><TABLE class="cc abstand-liste einzug-standard "><TBODY><TR><TD class=einzug-liste>t </TD><TD>It is NOT permissible to use seat covers or protective covers which have not been approved for use on Audi seats with side airbags.</TD></TR></TBODY></TABLE><TABLE class="cc abstand-liste einzug-standard "><TBODY><TR><TD class=einzug-liste>t </TD><TD>Foam padding in backrest must not be cut in vicinity of side airbag.</TD></TR></TBODY></TABLE><TABLE class="cc abstand-liste einzug-standard "><TBODY><TR><TD class=einzug-liste>t </TD><TD>When installing, make sure seam for side airbag is straight.</TD></TR></TBODY></TABLE><TABLE class="cc abstand-liste einzug-standard "><TBODY><TR><TD class=einzug-liste>t </TD><TD>All upholstery clips (metal and plastic clips) must be renewed.</TD></TR></TBODY></TABLE><TABLE class="cc abstand-liste einzug-standard "><TBODY><TR><TD class=einzug-liste>t </TD><TD>We recommend using only genuine upholstery clips (same as original equipment).</TD></TR></TBODY></TABLE><TABLE class="cc abstand-liste einzug-standard "><TBODY><TR><TD class=einzug-liste>t </TD><TD>When installing, all new upholstery clips must be fitted in the same positions as the original ones.</TD></TR></TBODY></TABLE><TABLE class="cc abstand-liste einzug-standard "><TBODY><TR><TD class=einzug-liste>t </TD><TD>For safety reasons, the cover should always be renewed if it is damaged (tears, burn marks, etc.) in the area of the side airbag, as otherwise the side airbag will not inflate properly.</TD></TR></TBODY></TABLE><TABLE class="cc abstand-liste einzug-standard "><TBODY><TR><TD class=einzug-liste>t </TD><TD>Repairs to backrest cover in vicinity of side airbag are not permitted (due to special thread and precisely defined seam).</TD></TR></TBODY></TABLE><TABLE class="cc abstand-liste einzug-standard "><TBODY><TR><TD class=einzug-liste>t </TD><TD>Always renew backrest padding after side airbag has been triggered.</TD></TR></TBODY></TABLE><TABLE class="cc abstand-liste einzug-standard "><TBODY><TR><TD class=einzug-liste>t </TD><TD>All damaged components must be renewed after an accident. If you cannot detect any to the airbag unit, it can continue to be used.</TD></TR></TBODY></TABLE><TABLE class="cc abstand-liste einzug-standard "><TBODY><TR><TD class=einzug-liste>t </TD><TD>If side airbag units are renewed, remove sticker with airbag number from new side airbag unit and stick it over old sticker on seat pan.</TD></TR></TBODY></TABLE><TABLE class="cc abstand-liste einzug-standard "><TBODY><TR><TD class=einzug-liste>t </TD><TD>Never pierce upholstery needles or any other sharp objects through the seat cover fabric in the vicinity of the airbag and sensor mat.</TD></TR></TBODY></TABLE></TD><TD class=spalte-pfeil></TD><TD class=spalte-marg></TD></TR></TBODY></TABLE>
</TD></TR></TBODY></TABLE>

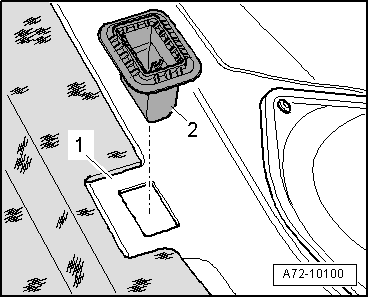
<TABLE class="cc bild-titel einzug-standard abstand-standard"><TBODY><TR><TD>Renewing retainers</TD></TR></TBODY></TABLE><TABLE class="cc einzug-standard abstand-standard "><TBODY><TR><TD class=einzug-liste>� </TD><TD>Remove used retainer from body cut-out.</TD></TR></TBODY></TABLE><TABLE class="cc einzug-standard abstand-standard "><TBODY><TR><TD class=einzug-liste>� </TD><TD>Fit new retainer -2- in opening -1- in body and push it in until you hear it engage.</TD></TR></TBODY></TABLE>
Last edited by royclark; 05-10-2012 at 10:35 AM.
Trending Topics
05-10-2012, 01:29 PM
#8
AudiWorld Member

Don't need to do all that extra work!
Use a telescoping magnet as audifoo123 said to catch the belt buckle while pulling out belt. Pull the belt quickly and let magnet catch the buckle.
Use a telescoping magnet as audifoo123 said to catch the belt buckle while pulling out belt. Pull the belt quickly and let magnet catch the buckle.
05-10-2012, 02:08 PM
#9
AudiWorld Senior Member
Join Date: Jun 2009
Location: Atlantic City Metro Area
Posts: 792
Likes: 0
Received 2 Likes
on
2 Posts
also have something a bit off topic
for those with rear side airbag... without removing the seat to check... is there any physical indication of the feature... is there any logos.. embossing ... imprint or label?
for those with rear side airbag... without removing the seat to check... is there any physical indication of the feature... is there any logos.. embossing ... imprint or label?
