My rear brake pads replacement experience
 04-22-2013, 03:55 AM
#1
AudiWorld Member
Thread Starter

Join Date: May 2009
Location: Toronto, Canada
Posts: 293
Likes: 0
Received 0 Likes
on
0 Posts
Hello, everyone!
I thought I would share the experience with rear brake pads replacement. I can tell you it was not smooth at all. Here are the detailed steps what I did and the issues I had to solve.
Selected the Jack Mode
Cycle the Parking brake ON and OFF.Connected to the ODB II and tried to open the rear parking brake ([Select]=>[53-Parking Brake]=>[Basic Settings-04]=> group 005=> [GO!]). Everything was fine at this step.
I've done the brake pads replacement, applied the required 35 Nm torque only to the top bolt as the bottom one has no space for my wrench. So the bottom one I've done by hands Pushed the brake pedal few times to set the brake pads to the right position and then I've
closed the Rear Parking Brakes ([Select]=>[53-Parking Brake]=>[Basic Settings-04]=>Group 006=>[GO!]) It closed it properly.
And here is where the problem begins...
I've tried to cycle the Parking brake ON (it did engaged it on), but when I pushed it to turned it OFF the electrical problem on the motors Error appeared on the dash!!!!! The parking brakes were stuck in closed position!!!!
I went to the VCD and tried to perform the Adaptation. It was 3 mm and I've changed it to 12, accepted. I went then to the Functional Test � it didn't do anything and it shows 0 Amps for both electrical motors!!! I've tried to erase the errors � they appeared immediately back (electrical problem with PB). I've tried to go back to group 005 to open it again, but the screens shows the error and did not allow opening it anymore. I went then to group 007 and tried to open it such way, but it was only showing 0 amps and didn't do anything. I've done million other things, but the Electrical parking brake error symbol was still on the dash.
I even tried to move the car to the garage, but you really have to push the gas to move it as the rear brakes were holding it very good ... so I gave up even on that idea.
Finally, I decided to calm down and look at my options. Sitting in the working car I've tried to release the brakes one more time � didn't work... Frustrated and thinking about posting the Q to this forum first, my lag pushed the brake pedal and my hand pressed the release the parking brake (I didn't think at this moment). And oh! Miracle!!!! The parking brakes got released and the electrical error symbol disappeared!!!! WTF?!?!?!?!?
I went to the adaptation and checked... it had 12mm in the value, I've done functional test (it worked this time) and cleared the errors (rear brake pads worn error).
Lesson Learned
Now, looking at it back I think the only step where I failed and the step that was causing so many issues is following. After closing the brakes in order to Cycle the Parking Brakes you should hold the brake pedal. I didn't hold the brake pedal, so it engaged it ON but didn't let me to release.
I think that was the difference influenced all those errors. I do not understand though why I had electrical error there, but that is my experience.
I hope it will help someone and maybe someone will help me to understand what did I do wrong.
Have a great day everyone!
I thought I would share the experience with rear brake pads replacement. I can tell you it was not smooth at all. Here are the detailed steps what I did and the issues I had to solve.
Selected the Jack Mode
Cycle the Parking brake ON and OFF.Connected to the ODB II and tried to open the rear parking brake ([Select]=>[53-Parking Brake]=>[Basic Settings-04]=> group 005=> [GO!]). Everything was fine at this step.
I've done the brake pads replacement, applied the required 35 Nm torque only to the top bolt as the bottom one has no space for my wrench. So the bottom one I've done by hands
Pushed the brake pedal few times to set the brake pads to the right position and then I've closed the Rear Parking Brakes ([Select]=>[53-Parking Brake]=>[Basic Settings-04]=>Group 006=>[GO!]) It closed it properly.
And here is where the problem begins...
I've tried to cycle the Parking brake ON (it did engaged it on), but when I pushed it to turned it OFF the electrical problem on the motors Error appeared on the dash!!!!! The parking brakes were stuck in closed position!!!!
I went to the VCD and tried to perform the Adaptation. It was 3 mm and I've changed it to 12, accepted. I went then to the Functional Test � it didn't do anything and it shows 0 Amps for both electrical motors!!! I've tried to erase the errors � they appeared immediately back (electrical problem with PB). I've tried to go back to group 005 to open it again, but the screens shows the error and did not allow opening it anymore. I went then to group 007 and tried to open it such way, but it was only showing 0 amps and didn't do anything. I've done million other things, but the Electrical parking brake error symbol was still on the dash.
I even tried to move the car to the garage, but you really have to push the gas to move it as the rear brakes were holding it very good
... so I gave up even on that idea.Finally, I decided to calm down and look at my options. Sitting in the working car I've tried to release the brakes one more time � didn't work... Frustrated and thinking about posting the Q to this forum first, my lag pushed the brake pedal and my hand pressed the release the parking brake (I didn't think at this moment). And oh! Miracle!!!! The parking brakes got released and the electrical error symbol disappeared!!!! WTF?!?!?!?!?
I went to the adaptation and checked... it had 12mm in the value, I've done functional test (it worked this time) and cleared the errors (rear brake pads worn error).
Lesson Learned
Now, looking at it back I think the only step where I failed and the step that was causing so many issues is following. After closing the brakes in order to Cycle the Parking Brakes you should hold the brake pedal. I didn't hold the brake pedal, so it engaged it ON but didn't let me to release.
I think that was the difference influenced all those errors. I do not understand though why I had electrical error there, but that is my experience.
I hope it will help someone and maybe someone will help me to understand what did I do wrong.
Have a great day everyone!
 04-22-2013, 08:17 AM
#2
AudiWorld Super User

You should perform adaptation before engaging parking brake. This way the module thought that pads are still 3 mm and engaged it to the electrical limit. It got stacked there because it needed even more power to disengage and you had electrical error. When you applied brake you relaxed parking brake mechanism a bit so it managed to disengage.
04-22-2013, 09:20 AM
#3
AudiWorld Member
Thread Starter
Join Date: May 2009
Location: Toronto, Canada
Posts: 293
Likes: 0
Received 0 Likes
on
0 Posts
it is quite interesting  It is against the order published on the Ross-Tech site. I was doing exactly based on the instructions. But your way of thinking may be right.
It is against the order published on the Ross-Tech site. I was doing exactly based on the instructions. But your way of thinking may be right.
04-22-2013, 09:21 AM
#4
AudiWorld Super User
Vicl,
All the time you're using VCDS, is the ignition ON or OFF? I read Elsawin, some part, the ignition has to be OFF? Is that true? Please give full step by step with the VCDS, I think I'm going to do it very soon.
Thanks,
Louis
All the time you're using VCDS, is the ignition ON or OFF? I read Elsawin, some part, the ignition has to be OFF? Is that true? Please give full step by step with the VCDS, I think I'm going to do it very soon.
Thanks,
Louis
04-22-2013, 11:12 AM
#5
AudiWorld Member
Thread Starter
Join Date: May 2009
Location: Toronto, Canada
Posts: 293
Likes: 0
Received 0 Likes
on
0 Posts
for the VCD - yes you need the ignition ON when you are doing the programming. VCD cannot do anything if ignition is off. Personally in my case I had my engine running. Some ppl. prefere to have ignition ON with no running engine
Let me actually write up step bt step instructions later on today. I'll post what I've done.
Let me actually write up step bt step instructions later on today. I'll post what I've done.
04-23-2013, 04:31 AM
#7
AudiWorld Member
Thread Starter
Join Date: May 2009
Location: Toronto, Canada
Posts: 293
Likes: 0
Received 0 Likes
on
0 Posts
Itooz! As per your request here are the detailed steps I followed.
Broze! It'll be nice if you'll comment the steps I followed and if you had the same.
The source of the steps came from Ross-Tech and from ELSA
0. Ignition ON (in my case the engine was running)
1. Select Jack Mode
2. Cycle the Parking Brake ON, then OFF (in this step I did hold the brake pedal as well)
3. Connect VCD
4. Open Parking Brake
[Select]
[53 - Parking Brake]
[Basic Settings - 04]
[Group 005]
[GO!]
Once it finished waited another 30 sec or so.
[Done, Go Back]
[Close Controller, Go back - 06]
5. Turn the ignition OFF
Mechanical part:
6. Remove securing bolts from brake caliper housing, when doing this counter-hold on guide pins.
Note: Do not unplug connection of actuator motor and/or brake system.
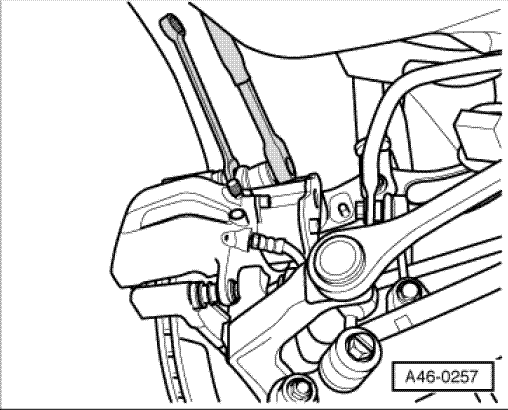
7. I pushed back the piston by applying the force between the pad and caliper.
8. insert pad retaining springs

9. fit the brake pads

10. Ensure that the brake pads are located correctly in the pad retainers

11. Secure brake caliper housing with new self-locking bolts. You have to apply 35 Nm force. As you read early I could apply it only to the top bolt. The bottom one I had to do by hands guessing the force as there is no space for the wrench.
Note: The repair kit includes four self-locking hexagon bolts which must always be installed
back to the VCD...
As I'm writing those instructions and recall the MishaR's comments, plus reviewed the ELSA I think the next step should be the adaptation (but I closed the brakes instead)!!!!!
12. Adaptation
[Select]
[53 - Parking Brake]
[10 - Adaptation]
Channel 06
[Read]
New value = 12 (that is my new pad)
[Test]
[Save]
Confirm [Yes]
[Done, Go Back]
13. Close Rear Parking Brake
[Select]
[53 - Parking Brake]
[Basic Settings - 04]
[Group 006]
[GO!]
Once it finished waited another 30 sec or so.
[Done, Go Back]
[Close Controller, Go back - 06]
14. That is the last step. According to ELSA the last step should be:
Electronic parking brake must be released.
- Selector lever must be in position "P".
� Switch off ignition, take out ignition key and lock steering.
Recalibration will now be performed.
- The electronic parking brake retracts and closes again audibly.
- It then sets the required clearance automatically.
� Wait for this process to be completed.
Recalibration is now completed.
According to the Ross-Tech the functional test needs to be performed (I had to do that as I had number of issues. See the first post )
[Select]
[53 - Parking Brake]
[Basic Settings - 04]
[Group 010]
[GO!]
Once it finished waited another 30 sec or so.
[Done, Go Back]
[Close Controller, Go back - 06]
15. Then erase fault memory.
Broze! It'll be nice if you'll comment the steps I followed and if you had the same.
The source of the steps came from Ross-Tech and from ELSA
0. Ignition ON (in my case the engine was running)
1. Select Jack Mode
2. Cycle the Parking Brake ON, then OFF (in this step I did hold the brake pedal as well)
3. Connect VCD
4. Open Parking Brake
[Select]
[53 - Parking Brake]
[Basic Settings - 04]
[Group 005]
[GO!]
Once it finished waited another 30 sec or so.
[Done, Go Back]
[Close Controller, Go back - 06]
5. Turn the ignition OFF
Mechanical part:
6. Remove securing bolts from brake caliper housing, when doing this counter-hold on guide pins.
Note: Do not unplug connection of actuator motor and/or brake system.
7. I pushed back the piston by applying the force between the pad and caliper.
8. insert pad retaining springs
9. fit the brake pads
10. Ensure that the brake pads are located correctly in the pad retainers
11. Secure brake caliper housing with new self-locking bolts. You have to apply 35 Nm force. As you read early I could apply it only to the top bolt. The bottom one I had to do by hands guessing the force as there is no space for the wrench.
Note: The repair kit includes four self-locking hexagon bolts which must always be installed
back to the VCD...
As I'm writing those instructions and recall the MishaR's comments, plus reviewed the ELSA I think the next step should be the adaptation (but I closed the brakes instead)!!!!!
12. Adaptation
[Select]
[53 - Parking Brake]
[10 - Adaptation]
Channel 06
[Read]
New value = 12 (that is my new pad)
[Test]
[Save]
Confirm [Yes]
[Done, Go Back]
13. Close Rear Parking Brake
[Select]
[53 - Parking Brake]
[Basic Settings - 04]
[Group 006]
[GO!]
Once it finished waited another 30 sec or so.
[Done, Go Back]
[Close Controller, Go back - 06]
14. That is the last step. According to ELSA the last step should be:
Electronic parking brake must be released.
- Selector lever must be in position "P".
� Switch off ignition, take out ignition key and lock steering.
Recalibration will now be performed.
- The electronic parking brake retracts and closes again audibly.
- It then sets the required clearance automatically.
� Wait for this process to be completed.
Recalibration is now completed.
According to the Ross-Tech the functional test needs to be performed (I had to do that as I had number of issues. See the first post
)[Select]
[53 - Parking Brake]
[Basic Settings - 04]
[Group 010]
[GO!]
Once it finished waited another 30 sec or so.
[Done, Go Back]
[Close Controller, Go back - 06]
15. Then erase fault memory.
Last edited by Vicl; 04-23-2013 at 09:03 AM.
Trending Topics
04-23-2013, 08:59 AM
#9
AudiWorld Member
Thread Starter
Join Date: May 2009
Location: Toronto, Canada
Posts: 293
Likes: 0
Received 0 Likes
on
0 Posts
Yes! Everything is working perfectly
But I've described what took me to get to that point. My hair was about to get gray
Unfortunately no one has step by step instructions and everyone was saying it was EASY.
At least thanks to you I�ve posted what I think I�ll do next time (I hope not that soon)!
But I've described what took me to get to that point. My hair was about to get gray
Unfortunately no one has step by step instructions and everyone was saying it was EASY.
At least thanks to you I�ve posted what I think I�ll do next time (I hope not that soon)!
Last edited by Vicl; 04-23-2013 at 09:34 AM.
04-23-2013, 09:47 AM
#10
AudiWorld Super User
yes, everyone up here seems to be genius, everything is always easy. I'll have a good procedure when I do mine. Thanks again VICL. I need to understand how the system works, then I can understand why it does what it does and why we screw up as we do.
Cheers,
Louis
Cheers,
Louis