
 07-22-2016, 03:32 PM
Last edit by: IB Advertising
See related guides and technical advice from our community experts:
- Audi A4 B8 How to Replace Wheel Bearings<br>Step by step instructions for do-it-yourself repairs.

Remove and press wheel bearings while still on the car
08-29-2013, 05:21 PM
#1
AudiWorld Member
Thread Starter
Join Date: Jan 2004
Location: Seattle
Posts: 114
Likes: 0
Received 0 Likes
on
0 Posts
I was planning on writing up a little something on my recent wheel bearing job, but everything I did is covered in these two videos which I watched beforehand. I did pretty much everything this guy did. So I'll just share these videos and add a couple of notes that are a little more specific for our cars.
1)
2)
I bought the same wheel bearing kit as in the video seen here: http://www.harborfreight.com/fwd-fro...ers-66829.html
As he says in the video, even though it says "front wheel" on the box, it works just fine on the rears too.
I also got the bearing separators found here: http://www.harborfreight.com/bearing...set-93980.html
and here: http://www.harborfreight.com/large-b...ator-3979.html
I used it to remove and install all four wheel bearings in my 1986 4000 CS quattro.
I loosened the axle nuts with the car still on the ground. Then I raised the car, removed the wheels, calipers (which I hung out of the way), rotors, dust shields, and moved the axles out of the way. I also loosened the tie rod ends and ball joints since I was replacing them anyway. I did not replace the rear tie rods since they are about $120 a piece, but I did disconnect them. It made accessing the wheel bearing a lot easier. Especially the inside snap rings (which are kind of a pain).
I pulled the hubs, just like in the video. The large bearing separator really is only used as a backing plate in this case. I worked my way around and slowly but surely, and they came out with ease.
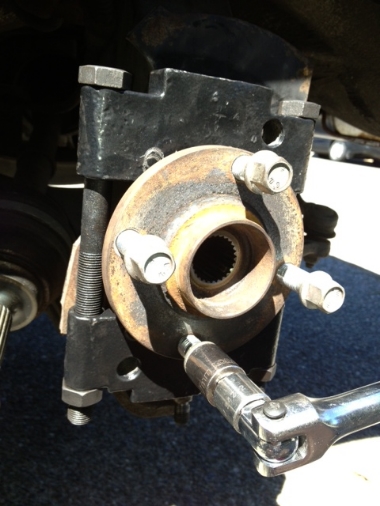
As in the video, I found a die that was just a hair smaller than the wheel bearing and placed it on the inside race, and I set up the retainer on the outer side as seen here:

Notes:
The bolt started shearing with the first use. I lubed it really well, but it is Harbor Freight after all. I exchanged it at the store for another kit, but same problem. I tried using a big bolt and nut I got from the hardware store, but didn't hold much hope for it not stripping. To my surprise, it worked WAY better! Again, I used plenty of grease on the treads and I couldn't find a one that even started to shear. The only real difference is that the nut and bolt I bought from the store are the same size on each end (they took a 1 1/8" wrench/socket) whereas the nut and bolt in the kit are two different sizes and the nut is really long so you can keep a wrench on it as it goes into the hole. To compensate, I just added more dies.
When it came time to put some muscle into it, I loosely reattached the ball joint and tie rod. This helped me keep the assembly stable.
For some reason, the front bearings required a lot more force to get in and out. I had to bust out the long breaker bar for those. Also, the front bearing stayed intact when I pulled the hubs. Only the rears separated leaving the race on the hub. This is where the bearing separator set comes in handy. I've seen videos of people cutting the race of the hub, but this set makes pulling the race off a breeze. Plus there's no real danger of damaging the hub.
When it came time to press in the new bearing, I again worked from the inside out. Pressing the bushing requires one die just a hair smaller than the bearing so it pushes on the outer most part of the bearing but still fits through the assembly. Any die that is bigger than the opening on the other side will work just fine. You do not need to use the tube part. Since the inside of the assembly is far from flat, I chose to press the bearing in from the inside and put the larger die on the outside. Be sure everything is lined up as straight as you can get it. I used a thin film of anti-seize on the bearing housing as well as on the hub when I reinstalled it. When I felt I was getting close to the bearing being all the way in, I'd remove the tool and take a peek. I would then work slowly while feeling for any increase in resistance that would tell me I've hit the outer snap ring. About those snap rings; they were giving me fight. I got the biggest pair of snap ring pliers that Sears had but they were still a bit too small. I don't know how many times they'd shoot off the end of the pliers and across the driveway. I was sure to have safety glasses on cause these things were dangerous! I got fed up and didn't want to go shopping around for bigger pliers so using a Dremel, I carved a small notch in the ends of a pair of needle nose pliers, and boy did they work like a charm!
Here's a mistake I made: When I was reinstalling my first hub, I thought that the inner snap ring would hold the bearing in while the hub was being pushed in. The problem is that it pushed the seal into the ring and cut into it. I had to do that one over. Oh well, one of my main goals with projects like this is learning! I then used a die inside the bearing housing while pressing the hub. Once installed almost all the way, I installed the snap ring. Torquing the axle will finish setting the hub.
All in all, I'm not sure if it was actually easier to do it this way rather than removing the entire assembly and putting them on a shop press since I was pretty much just one bolt away from removing the whole assemblies anyway. I guess the advantage is you don't need a press or have to rely on a shop. Also, if you can do it without undoing the ball joints then you wouldn't need an alignment. But like I said before, I replaced mine anyway. They're not much money so I figured why not?
Side note: I returned the bearing separators when I was done
1)
I bought the same wheel bearing kit as in the video seen here: http://www.harborfreight.com/fwd-fro...ers-66829.html
As he says in the video, even though it says "front wheel" on the box, it works just fine on the rears too.
I also got the bearing separators found here: http://www.harborfreight.com/bearing...set-93980.html
and here: http://www.harborfreight.com/large-b...ator-3979.html
I used it to remove and install all four wheel bearings in my 1986 4000 CS quattro.
I loosened the axle nuts with the car still on the ground. Then I raised the car, removed the wheels, calipers (which I hung out of the way), rotors, dust shields, and moved the axles out of the way. I also loosened the tie rod ends and ball joints since I was replacing them anyway. I did not replace the rear tie rods since they are about $120 a piece, but I did disconnect them. It made accessing the wheel bearing a lot easier. Especially the inside snap rings (which are kind of a pain).
I pulled the hubs, just like in the video. The large bearing separator really is only used as a backing plate in this case. I worked my way around and slowly but surely, and they came out with ease.
As in the video, I found a die that was just a hair smaller than the wheel bearing and placed it on the inside race, and I set up the retainer on the outer side as seen here:
Notes:
The bolt started shearing with the first use. I lubed it really well, but it is Harbor Freight after all. I exchanged it at the store for another kit, but same problem. I tried using a big bolt and nut I got from the hardware store, but didn't hold much hope for it not stripping. To my surprise, it worked WAY better! Again, I used plenty of grease on the treads and I couldn't find a one that even started to shear. The only real difference is that the nut and bolt I bought from the store are the same size on each end (they took a 1 1/8" wrench/socket) whereas the nut and bolt in the kit are two different sizes and the nut is really long so you can keep a wrench on it as it goes into the hole. To compensate, I just added more dies.
When it came time to put some muscle into it, I loosely reattached the ball joint and tie rod. This helped me keep the assembly stable.
For some reason, the front bearings required a lot more force to get in and out. I had to bust out the long breaker bar for those. Also, the front bearing stayed intact when I pulled the hubs. Only the rears separated leaving the race on the hub. This is where the bearing separator set comes in handy. I've seen videos of people cutting the race of the hub, but this set makes pulling the race off a breeze. Plus there's no real danger of damaging the hub.
When it came time to press in the new bearing, I again worked from the inside out. Pressing the bushing requires one die just a hair smaller than the bearing so it pushes on the outer most part of the bearing but still fits through the assembly. Any die that is bigger than the opening on the other side will work just fine. You do not need to use the tube part. Since the inside of the assembly is far from flat, I chose to press the bearing in from the inside and put the larger die on the outside. Be sure everything is lined up as straight as you can get it. I used a thin film of anti-seize on the bearing housing as well as on the hub when I reinstalled it. When I felt I was getting close to the bearing being all the way in, I'd remove the tool and take a peek. I would then work slowly while feeling for any increase in resistance that would tell me I've hit the outer snap ring. About those snap rings; they were giving me fight. I got the biggest pair of snap ring pliers that Sears had but they were still a bit too small. I don't know how many times they'd shoot off the end of the pliers and across the driveway. I was sure to have safety glasses on cause these things were dangerous! I got fed up and didn't want to go shopping around for bigger pliers so using a Dremel, I carved a small notch in the ends of a pair of needle nose pliers, and boy did they work like a charm!
Here's a mistake I made: When I was reinstalling my first hub, I thought that the inner snap ring would hold the bearing in while the hub was being pushed in. The problem is that it pushed the seal into the ring and cut into it. I had to do that one over. Oh well, one of my main goals with projects like this is learning! I then used a die inside the bearing housing while pressing the hub. Once installed almost all the way, I installed the snap ring. Torquing the axle will finish setting the hub.
All in all, I'm not sure if it was actually easier to do it this way rather than removing the entire assembly and putting them on a shop press since I was pretty much just one bolt away from removing the whole assemblies anyway. I guess the advantage is you don't need a press or have to rely on a shop. Also, if you can do it without undoing the ball joints then you wouldn't need an alignment. But like I said before, I replaced mine anyway. They're not much money so I figured why not?
Side note: I returned the bearing separators when I was done
Last edited by Joeltron; 08-29-2013 at 05:30 PM.

 08-29-2013, 10:05 PM
#3
AudiWorld Senior Member
That is pretty wild. It definitely wouldn't have worked in my case, due to the mangled lug holes (swapping hubs was my main objective), but I might try that the next time I'm strictly after replacing the bearings.
-Rog
-Rog

Thread
Thread Starter
Forum
Replies
Last Post