When you click on links to various merchants on this site and make a purchase, this can result in this site earning a commission. Affiliate programs and affiliations include, but are not limited to, the eBay Partner Network.
Remote Start Install Write Up for B9 models - A4/S4, A5/S5, and RS5 for under $400!
Alright guys/gals, a few weeks ago I started looking into how I can get remote start integrated into my 2018 S5 without spending a fortune.
Prior to that, the only kit available was the one from 12 Volt Solutions, at a premium of $600 (remote start from OEM fob only), then about $200 for smartphone app connectivity. That's a lot of $!
So after research, I find that a reputable company in aftermarket alarms and remote starts called Compustart makes a kit that is almost plug and play for our B9 models. Most importantly, I only had to spend the equivalent of $380 USD total!
Here's what I did.
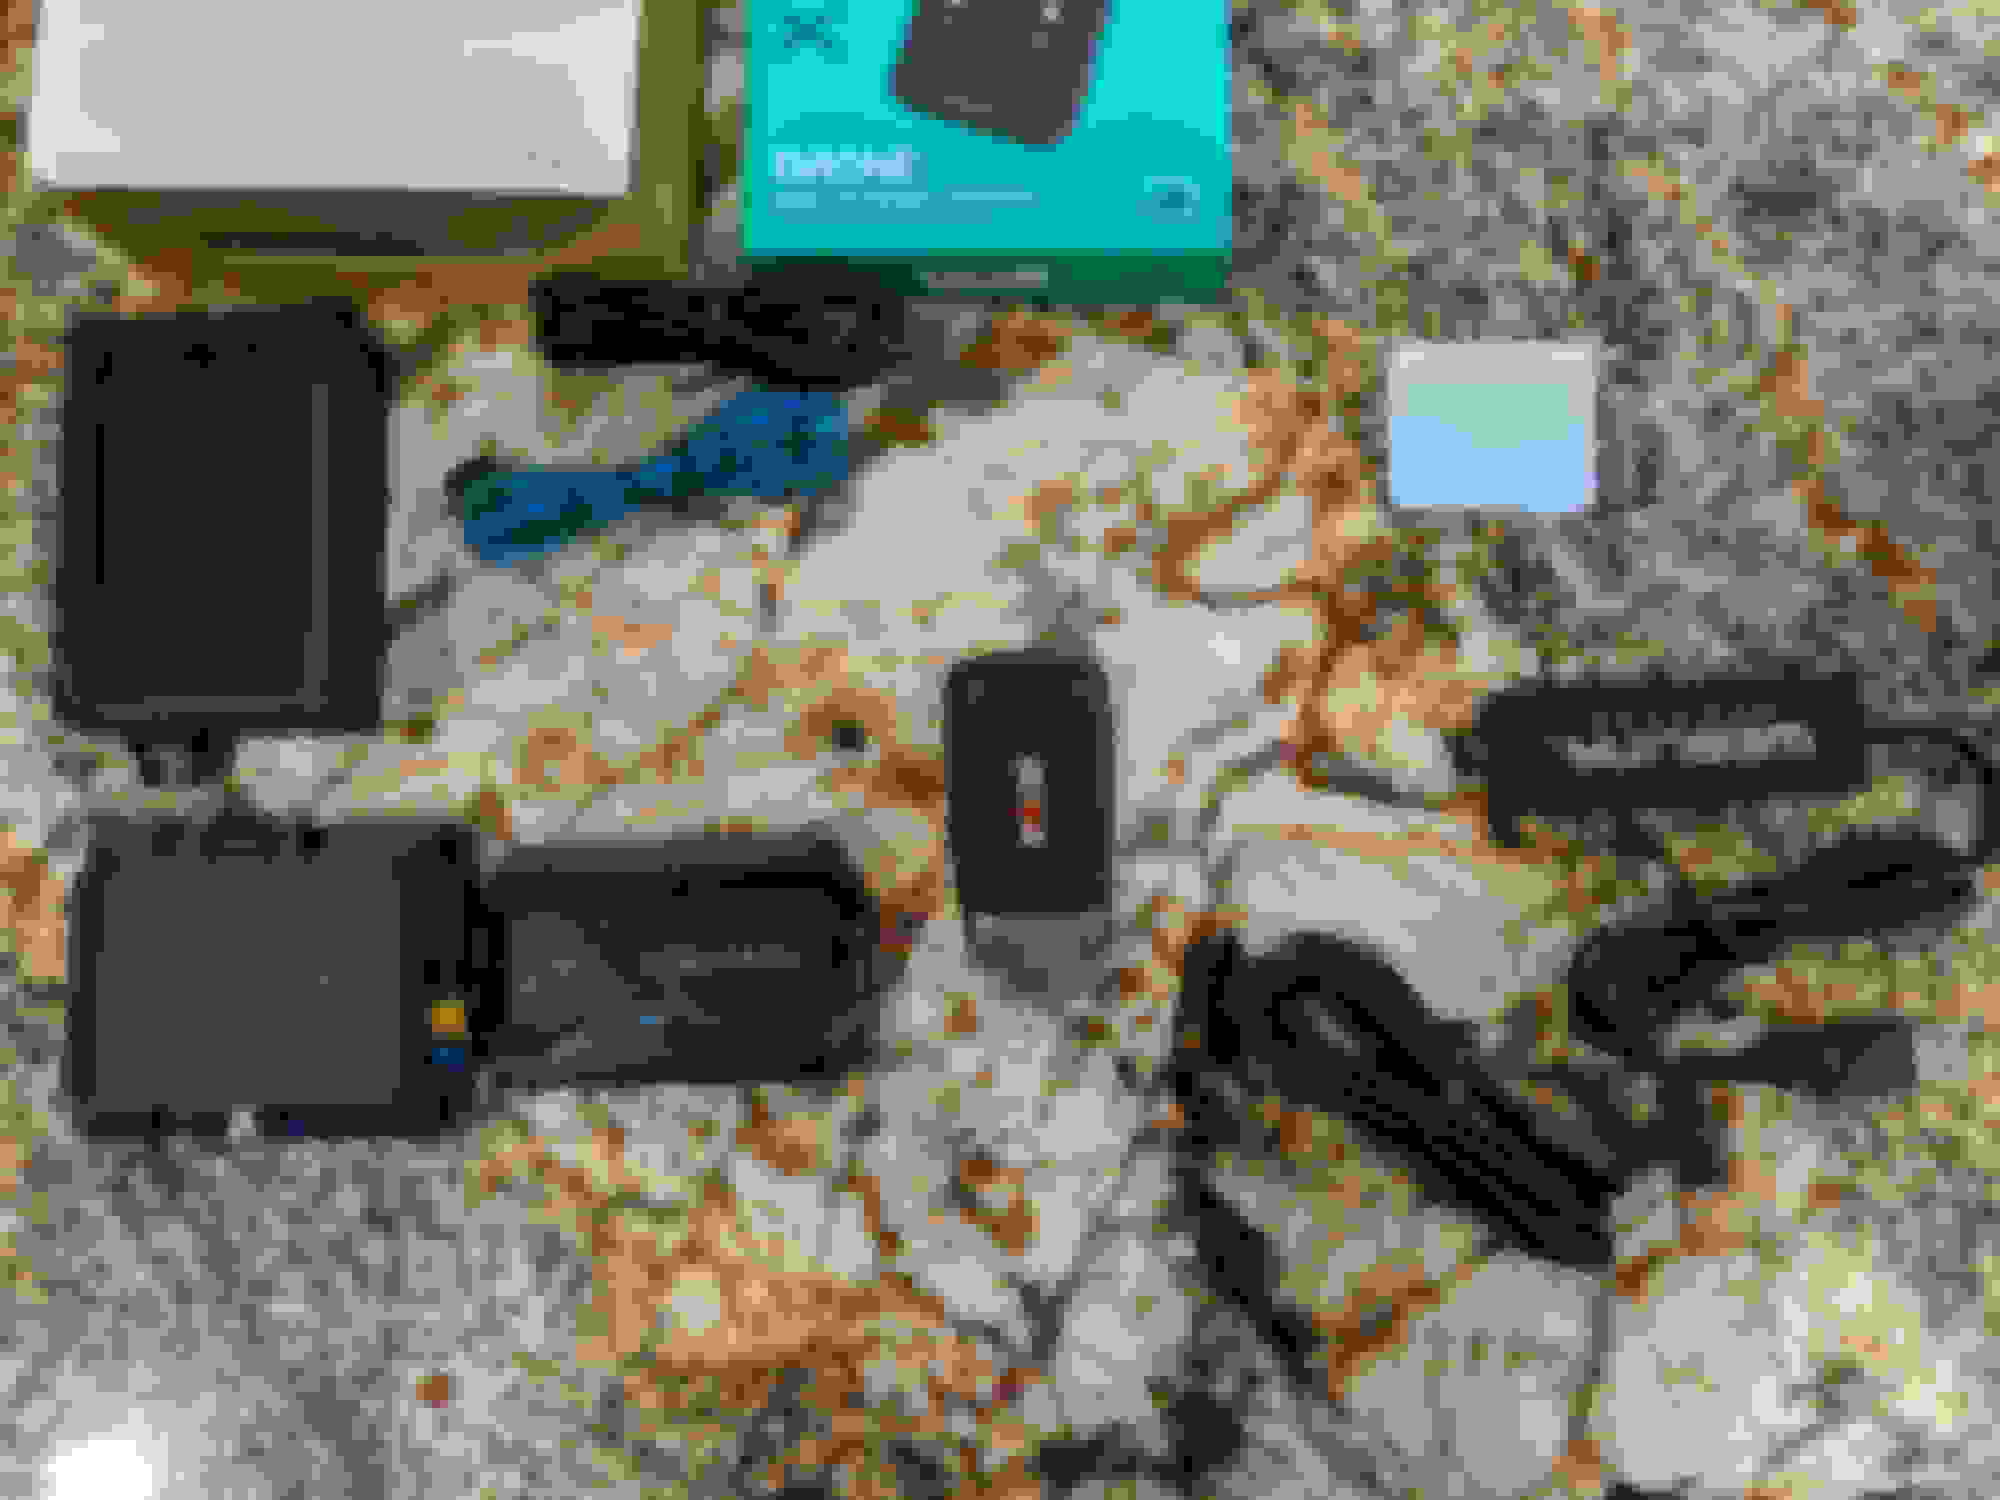
I put together a bundle compatible with my car. I bought the following:
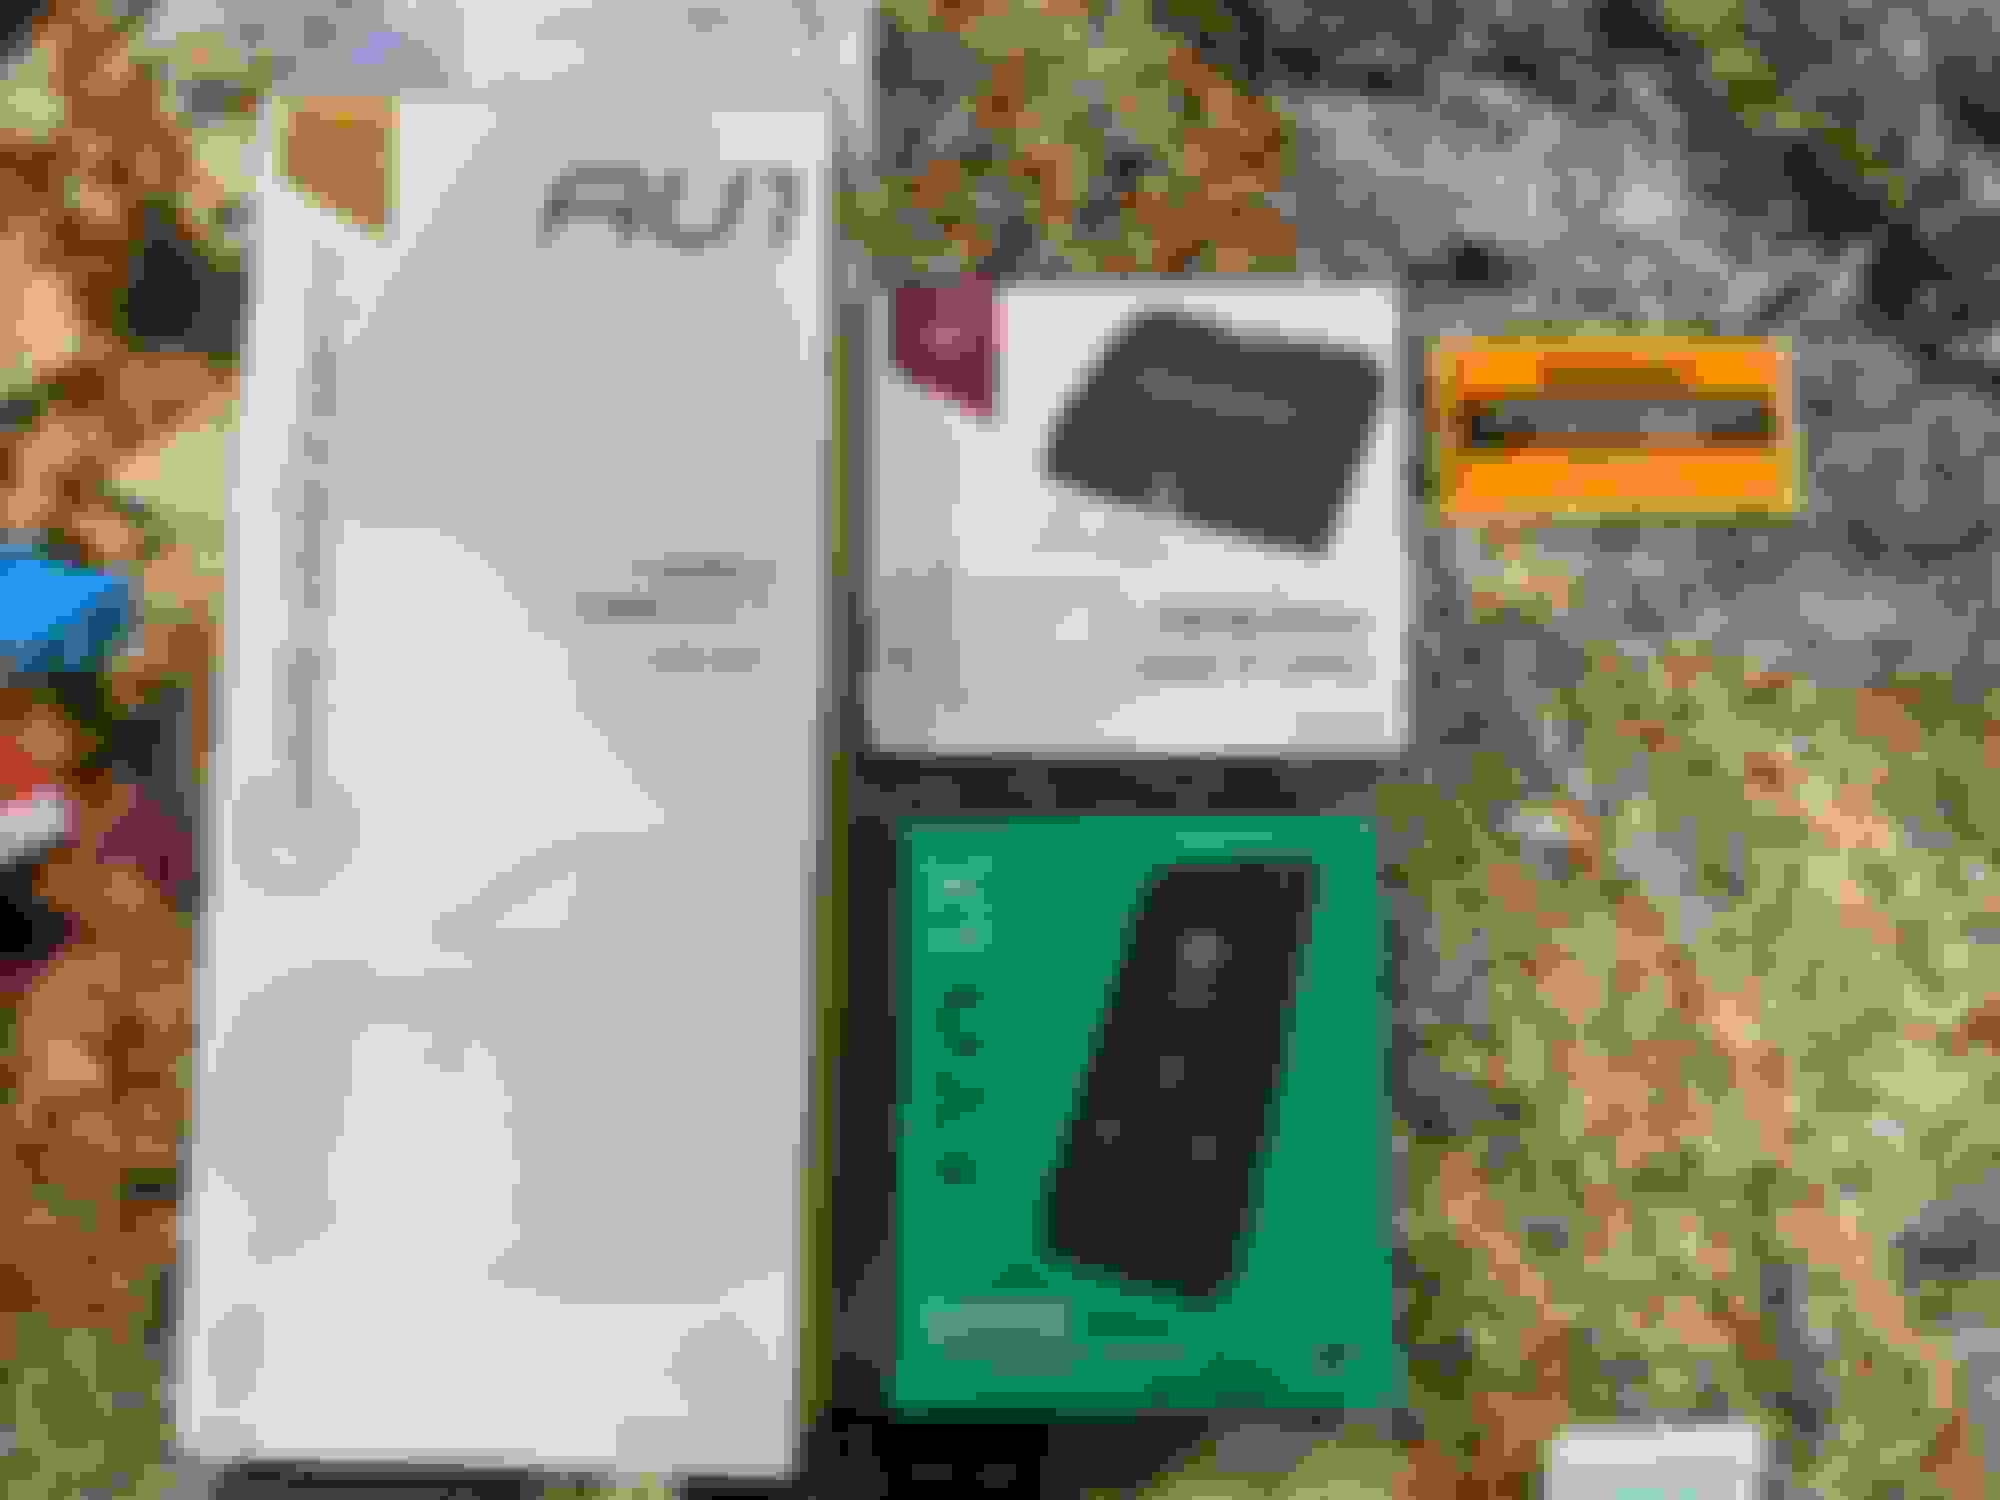
1. iDatastart CMVWXA0 Plug and Play Remote Starter for Audi/Volkswagen
2. iDatalink ADS-THR-AU1 integration T-harness for 2017+ vehicles.
3. Drone Mobile X1 Max LTE Smartphone control kit. This system only works for those in the US. Those in Canada need the X1R from Drone instead. If you are in neither, their still may be options from Fortin and Directed Electronics compatible in your country, but not from Drone. Either way, the OEM remote can be clicked 3x (the lock button) to remote start the car.
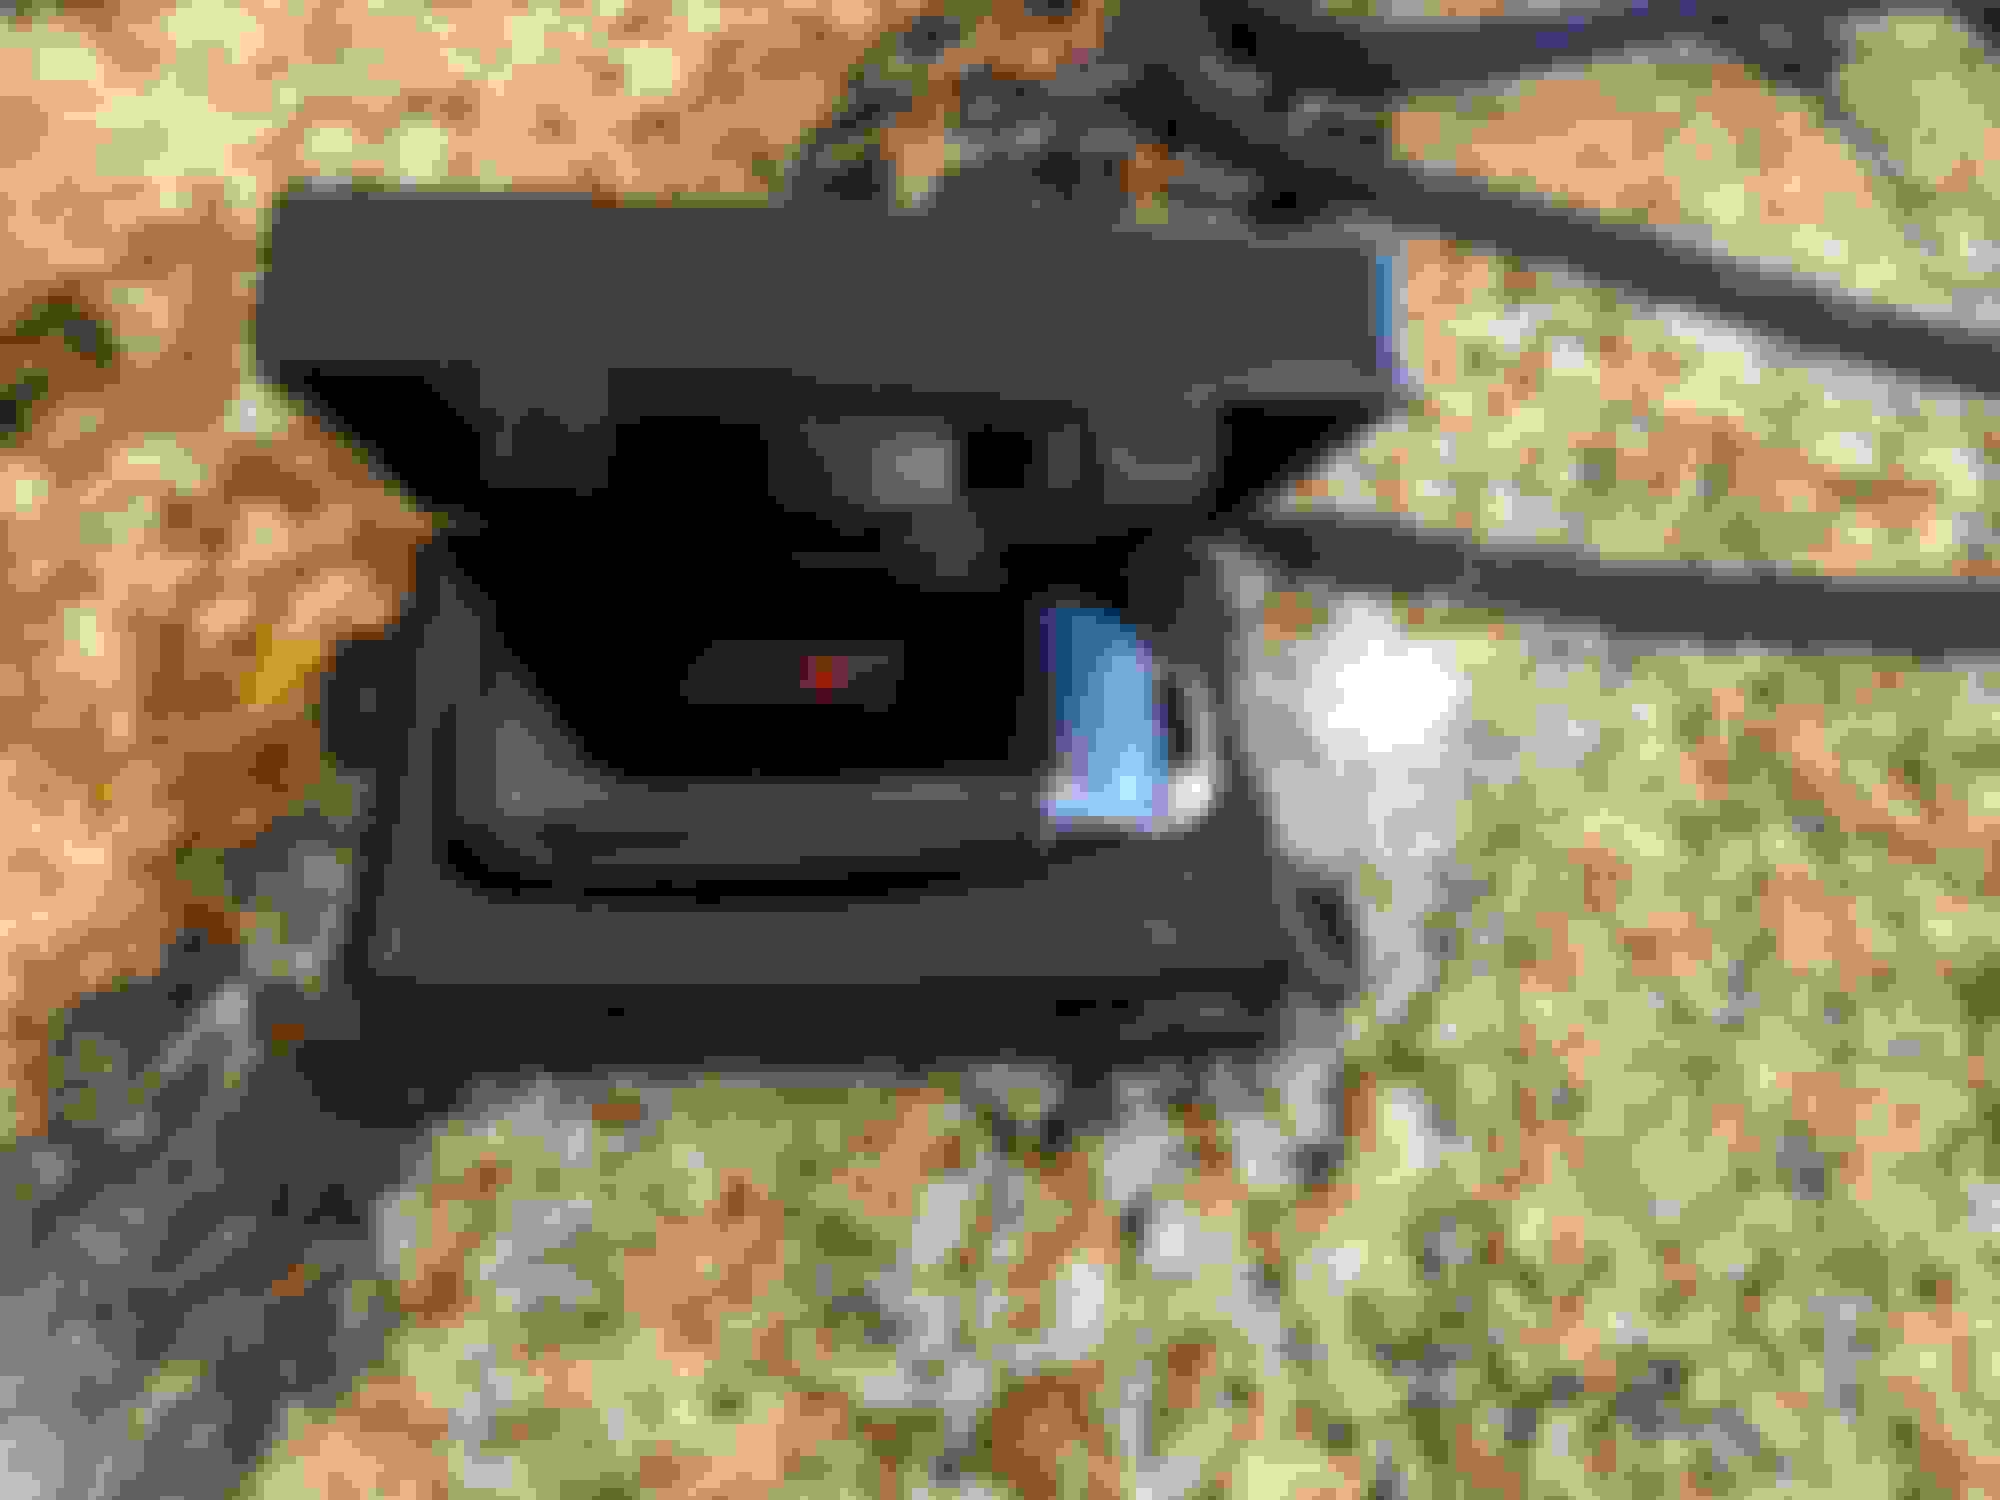
Also, like the 12 Volt Solutions options, one factory key must remain in the car, without the battery installed, inside a special designed electrical box. This is due to the immobilizer and is essentially unavoidable.
Anyways, on to the install steps. I will include pics but I will do it from my laptop.
Last edited by BreedsAs; 01-07-2020 at 11:23 PM.
Reason: Title correction
Everything pictured here is needed for the install, EXCEPT the little weblink updater cable I ordered by mistake.
The last picture is mainly the T harness that connects to 4 terminals on the BCM, and other wiring that came with the modules.
At this point, I advise all installers to stop and take pictures of the serial numbers of the X1 device, and the Compustart module. They both come with little cards that bear the serial numbers.
Also, remove the SIM card from the back of the X1 device and take a picture of it. It has a 20 digit ICCID number on it and you'll need the last 6 digits of it later.
For the X1 Max device, meant for US only, the SIM will be an AT&T SIM. If AT&T is not available in your area, then you can switch to a VZW SIM, that must be ordered through Drone Mobile. A typical Verizon SIM won't work! No other carriers will work in the US.
Here is the secondary fob, placed in the immobilizer disabling electric box, without the battery. The green connector of the T harness connects to the green connector on this box.
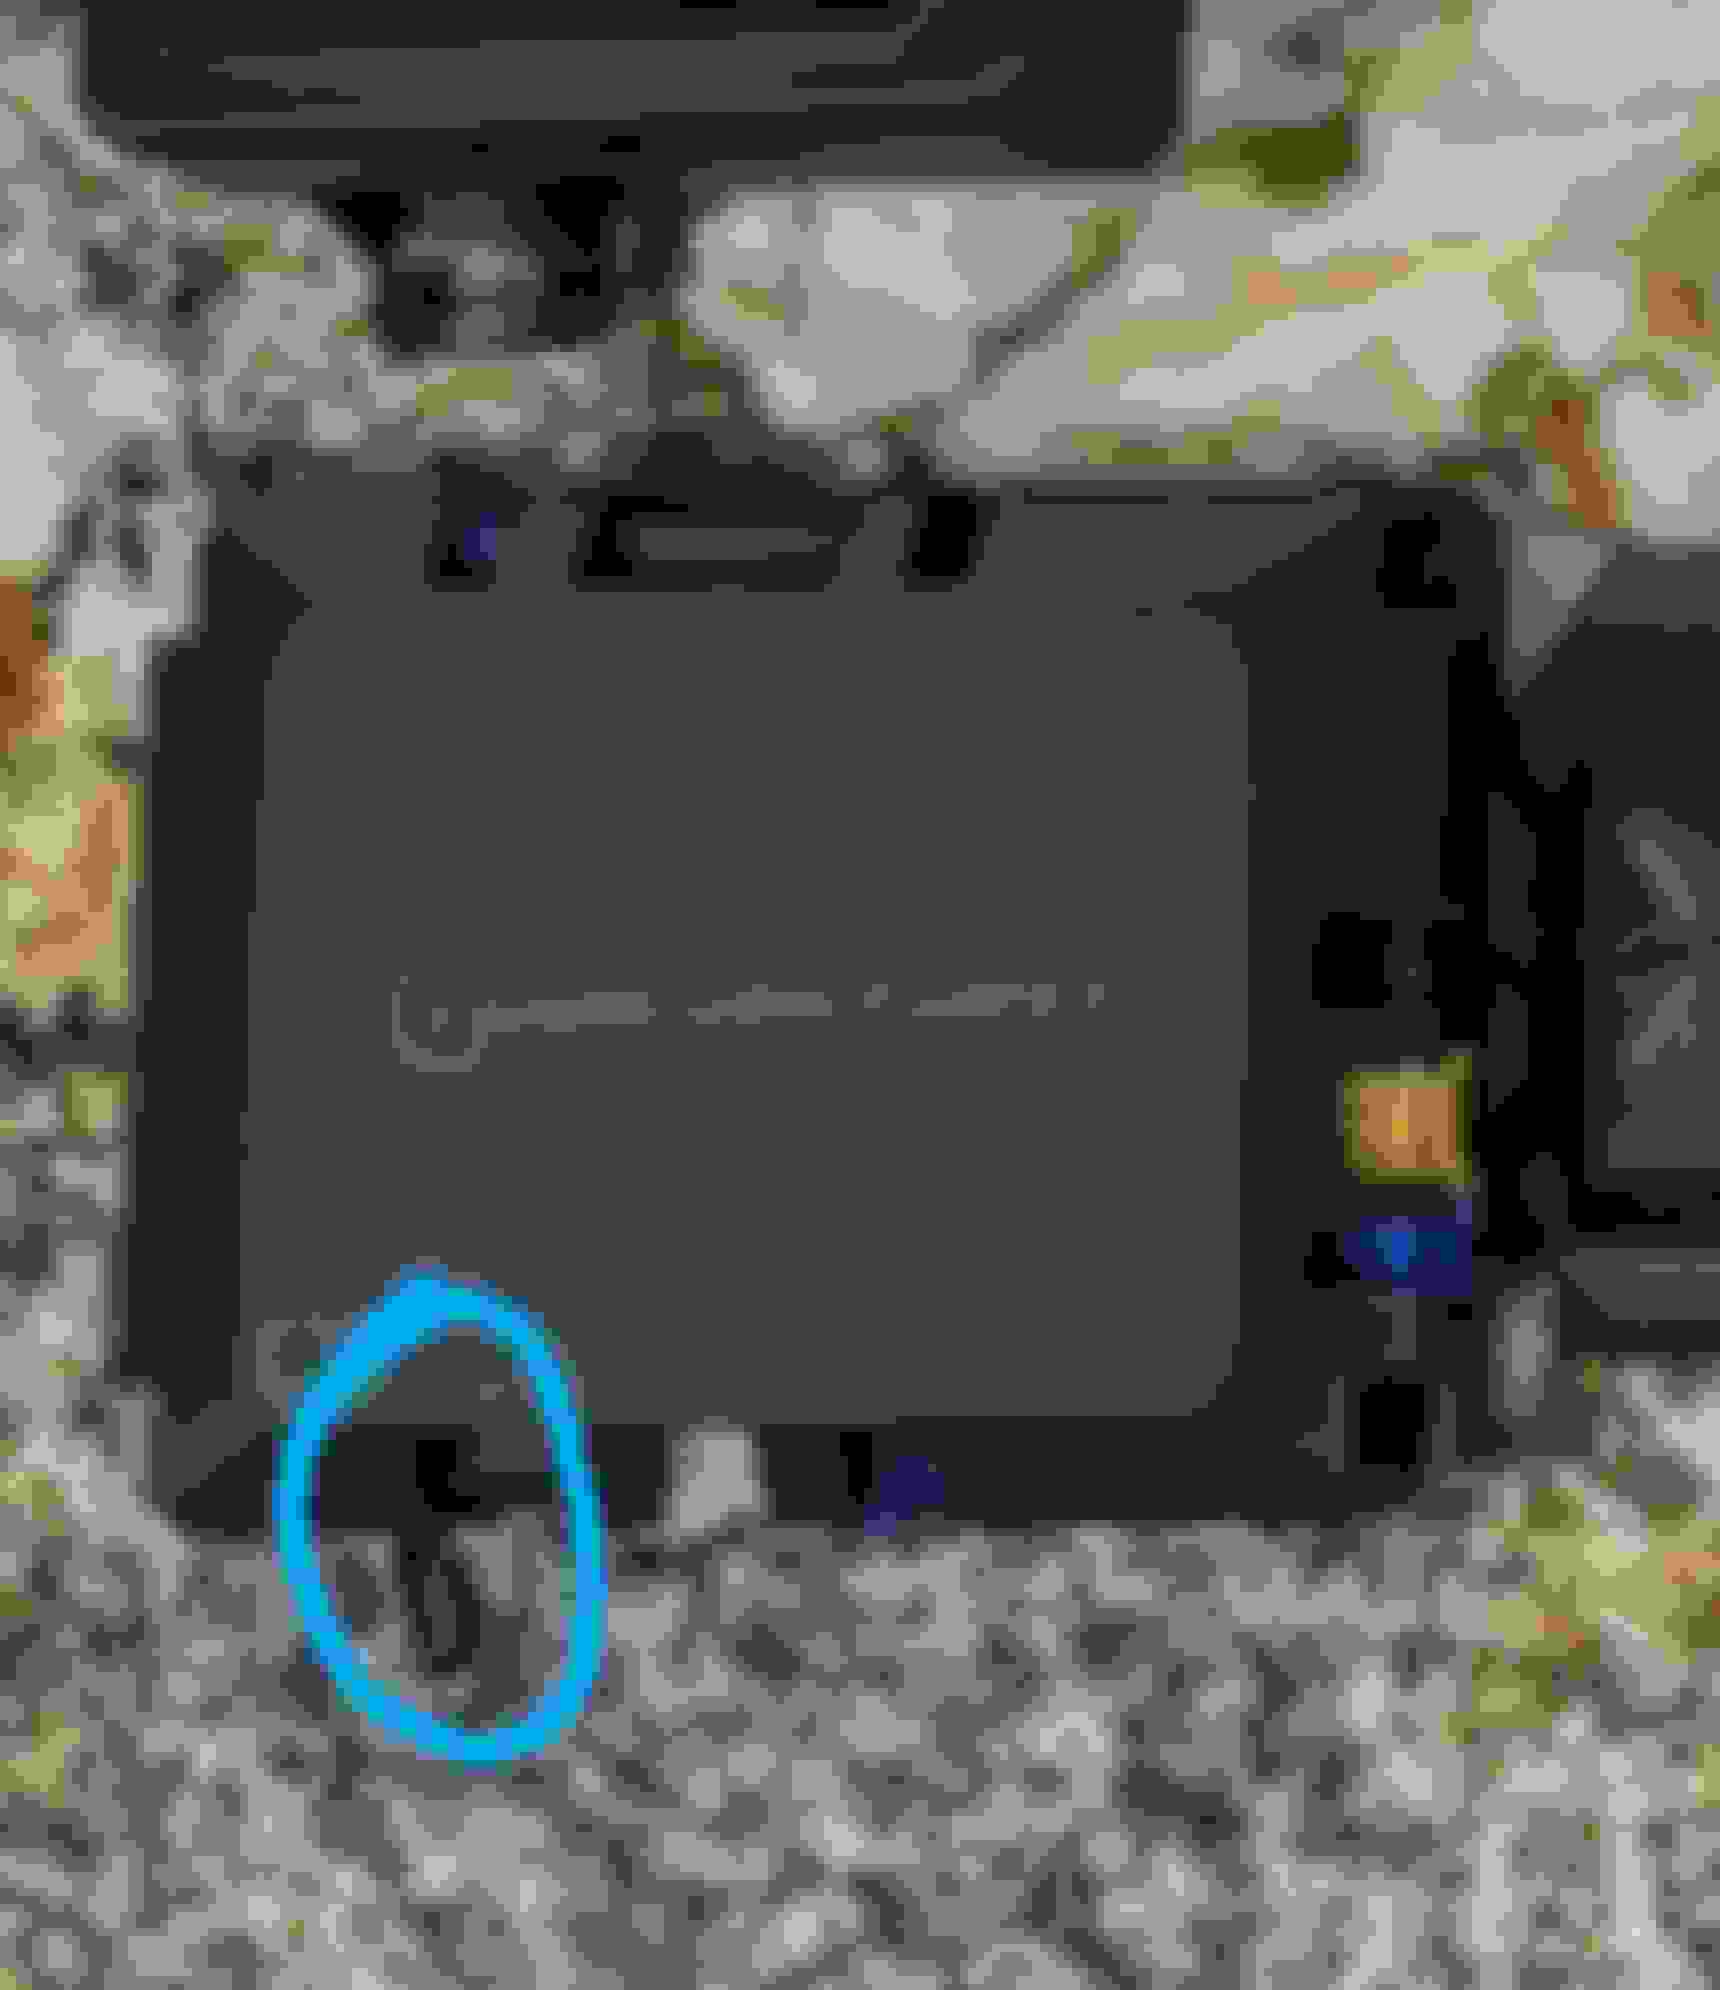
A crucial step is below. Those with an automatic transmission (all of us) need to cut the black looped wire on the lower right of the Compustart module circled below. Just use a scissors and snip it into two.
On these two next pics, the MS1 and MS2 connectors connect to the corresponding ports on the iDatastart Compustart device. They are also color coded.
In this part of the install, you will need a Windows only computer. Forget Mac here. It won't work. Windows 10 is what I used.
1.Y will also need to download any version of Internet Explorer (yeah I know it's archaic, but it's the easiest way). IE 9 or 10 is best. Don't bother with Internet Edge, it won't work.
2.T download Microsoft Framework 3.5. Really only 2.0 is needed, but 3.5 includes it.
3. JavaScript will need to be enabled in your IE browser. So will ActiveX. So disable ActiveX filtering.
4. Get on the iDatalink website. It should be orange/grey colored. If it's green, you're on the Maestro site, which is the wrong one.
Then click "flash your module" on the top right. There you will click "register a weblink account." Fill in all your information and put yourself down as a freelance installer.
Now you will need a Type A male, to Type B mini (5 pin) USB cable.
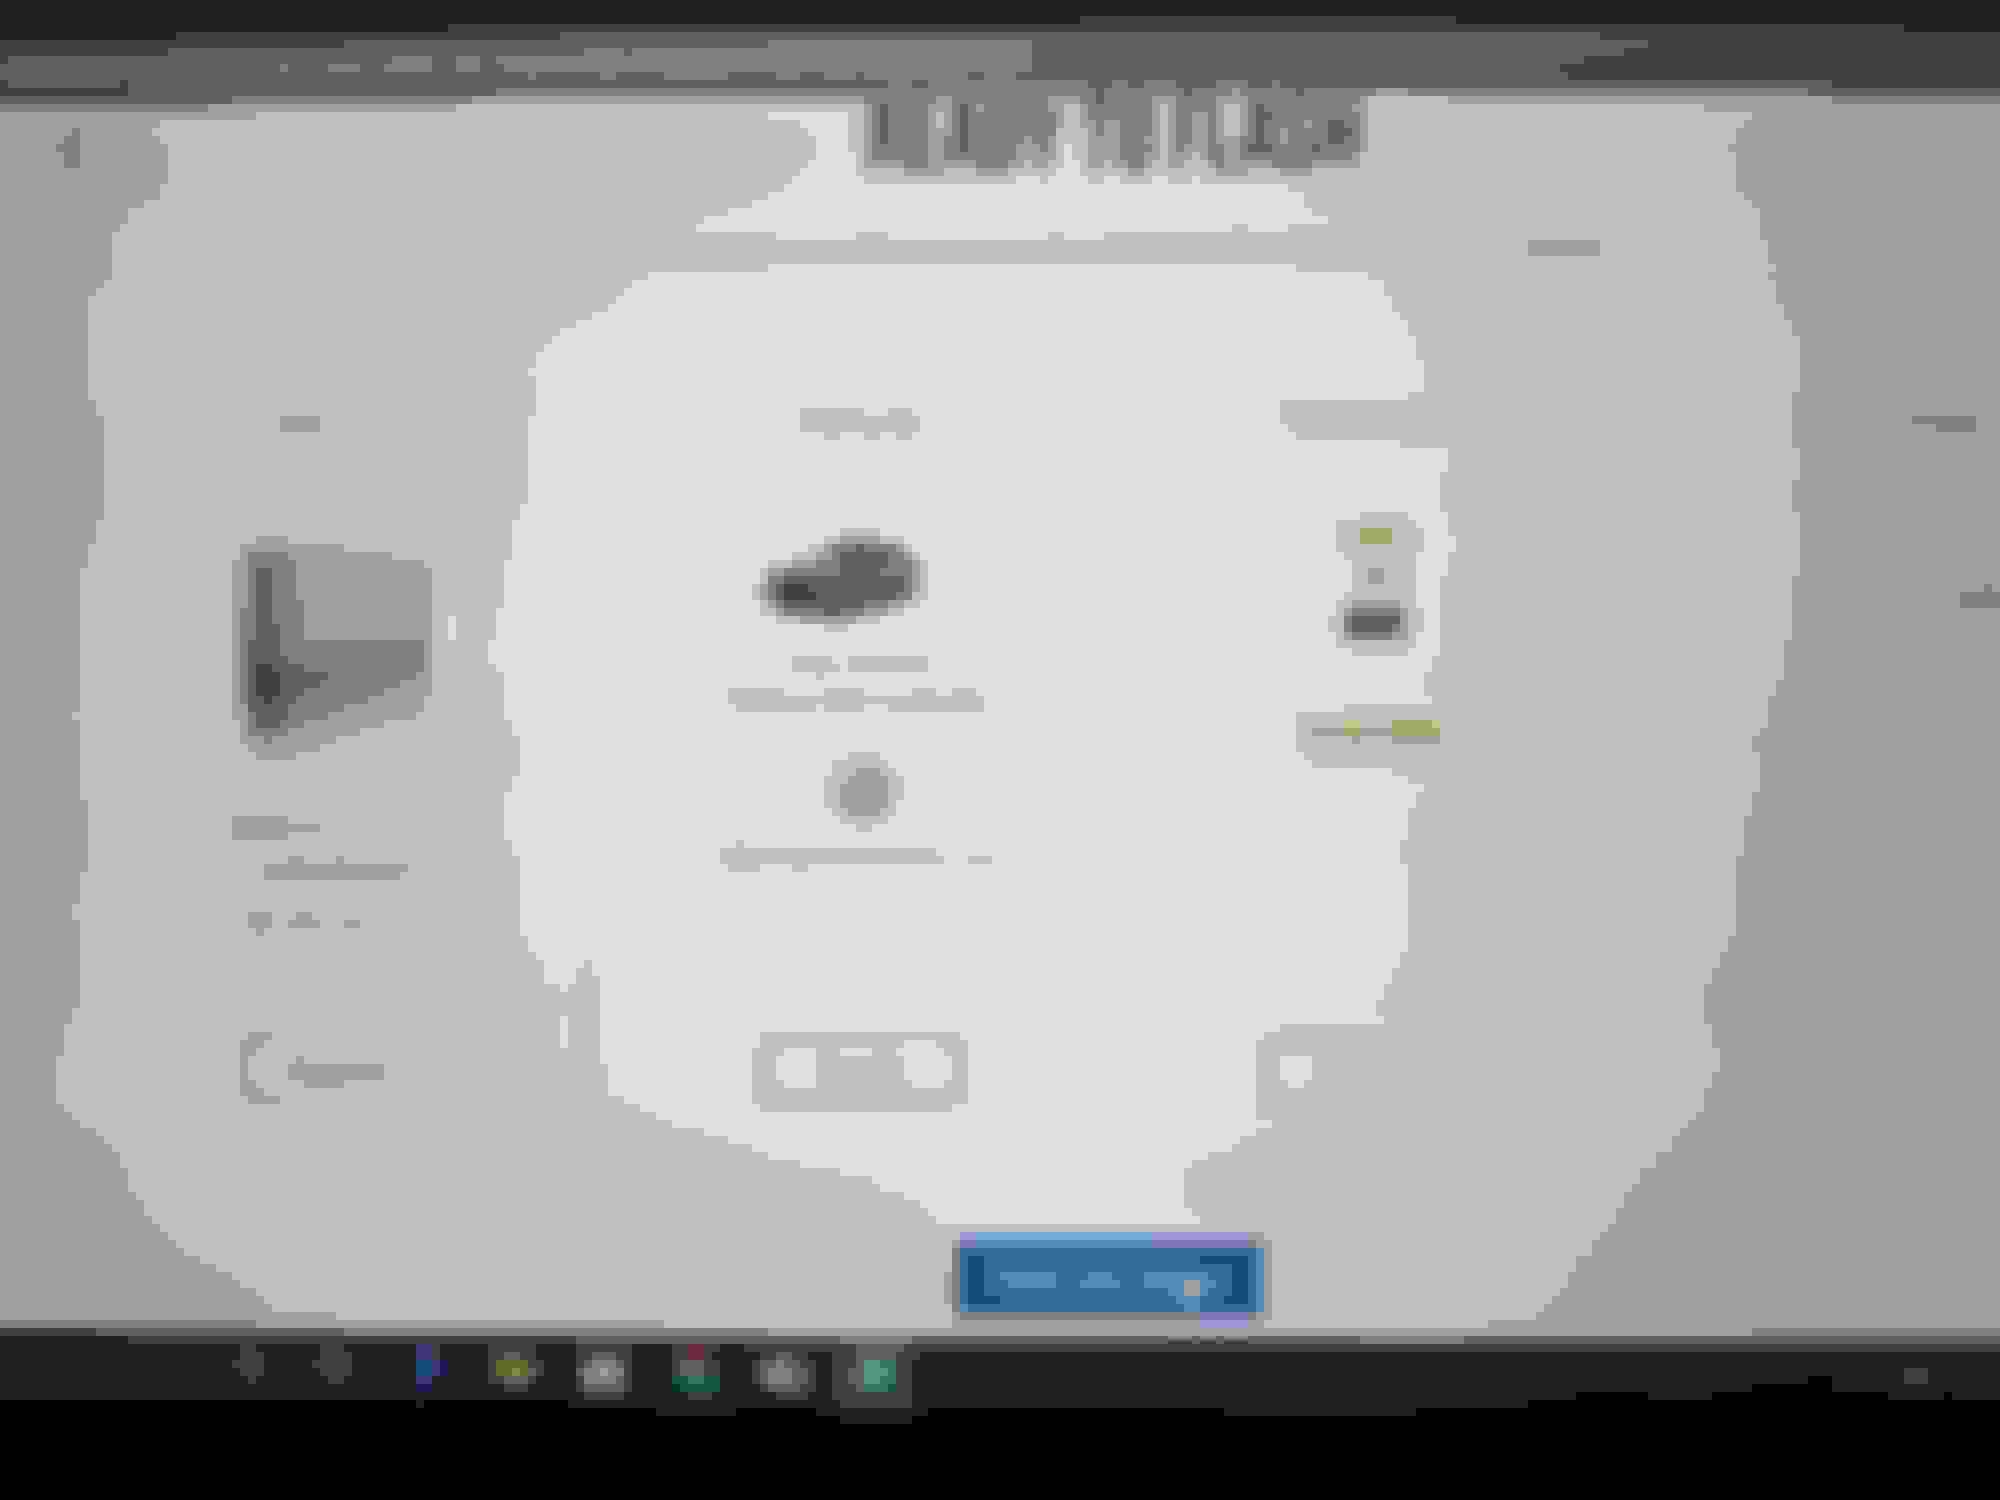
Plug the mini side to the Compustart module and the other side to the laptop. Then on the iDatalink site, flick flash your module. It should then go to a screen like below with setup steps that says Welcome to Weblink.
Configuration is really up to personal preferences, but there are a few important steps.
In the configuration menu, select Audi, then your model year.
Interestingly enough, the 2019 MY does not show the S5, but shows the RS5, A5, and even A4/S4. Select one of those if you have a 2019 and see if it works.
I have a 2018 which has the S5 option available.
Next, select Push to start automatic.
The following menu will show "remote configuration.
This is for aftermarket remotes, which most aren't using on this board so skip it and proceed to Telematics.
In Telematics, switch the toggle under the phone image to ON. The select which Telematics software you will use. I selected Drone Mobile here. Then proceeded to firmware.
The latest firmware available AS OF January 2020 is: IDSI-VWX-RSD-AUD1 with RSD-AUD v2.5 under it.
The selection box should show the latest available software regardless.
Next is the quick configuration menu. Remote start from the OEM fob should be set at lock, lock, lock (lock 3x).
The features and options menu is important too in the following categories.
1. Engine Type: Should be set to gas.
2. Engine Tach Detection: Should be left on the original setting, being Tach Data.
3. I set runtime to 10 minutes as 15 is too long.
4. Numbers 8, 9, and 10 should be disabled if you don't want your car starting when it wants to due to temperature.
5. 11 (Idle mode) and 13 (Take over should be left on enabled).
6.12 is turbo mode and I left it disabled even though I have a turbo. The OEM computer can control the cooling meant for the turbo on its own.
7.Everything else through number 25 in the remote starter category I left as is.
Next I clicked, Save and Go to Guides as the other settings categories I'm not interested in.
In the guides area, you are free to download them if you feel you need them. This write up should be enough to be fine.
Next, go to flash!
It will present a screenshot of your settings which will look similar to the pic below. Then flash away by clicking flash your device.
While flashing, look at your Compustart module you're plugged to and ensure the green led flashes, and your computer says flash was successfully completed.
Now unplug and you're done in the software category.
Here, installers just need to access the BCM connectors in the left side compartment of the trunk behind the little door.
The BCM plastic top is exposed for people without Bang and Olusfen. It is under the audio processor for people with it. Remove the processor clip by pressing on the release below.
I have an aftermarket Alpine amp in the background for my aftermarket subwoofer. Ignore it.
The plastic cover/retainer for the BCM has a 10mm bolt (left side of pic below with the socket extension on it), a push pin (bottom center of pic below), and clip holding to sound deadening material (right side of pic below).
All need to be removed to access the BCM connectors below.
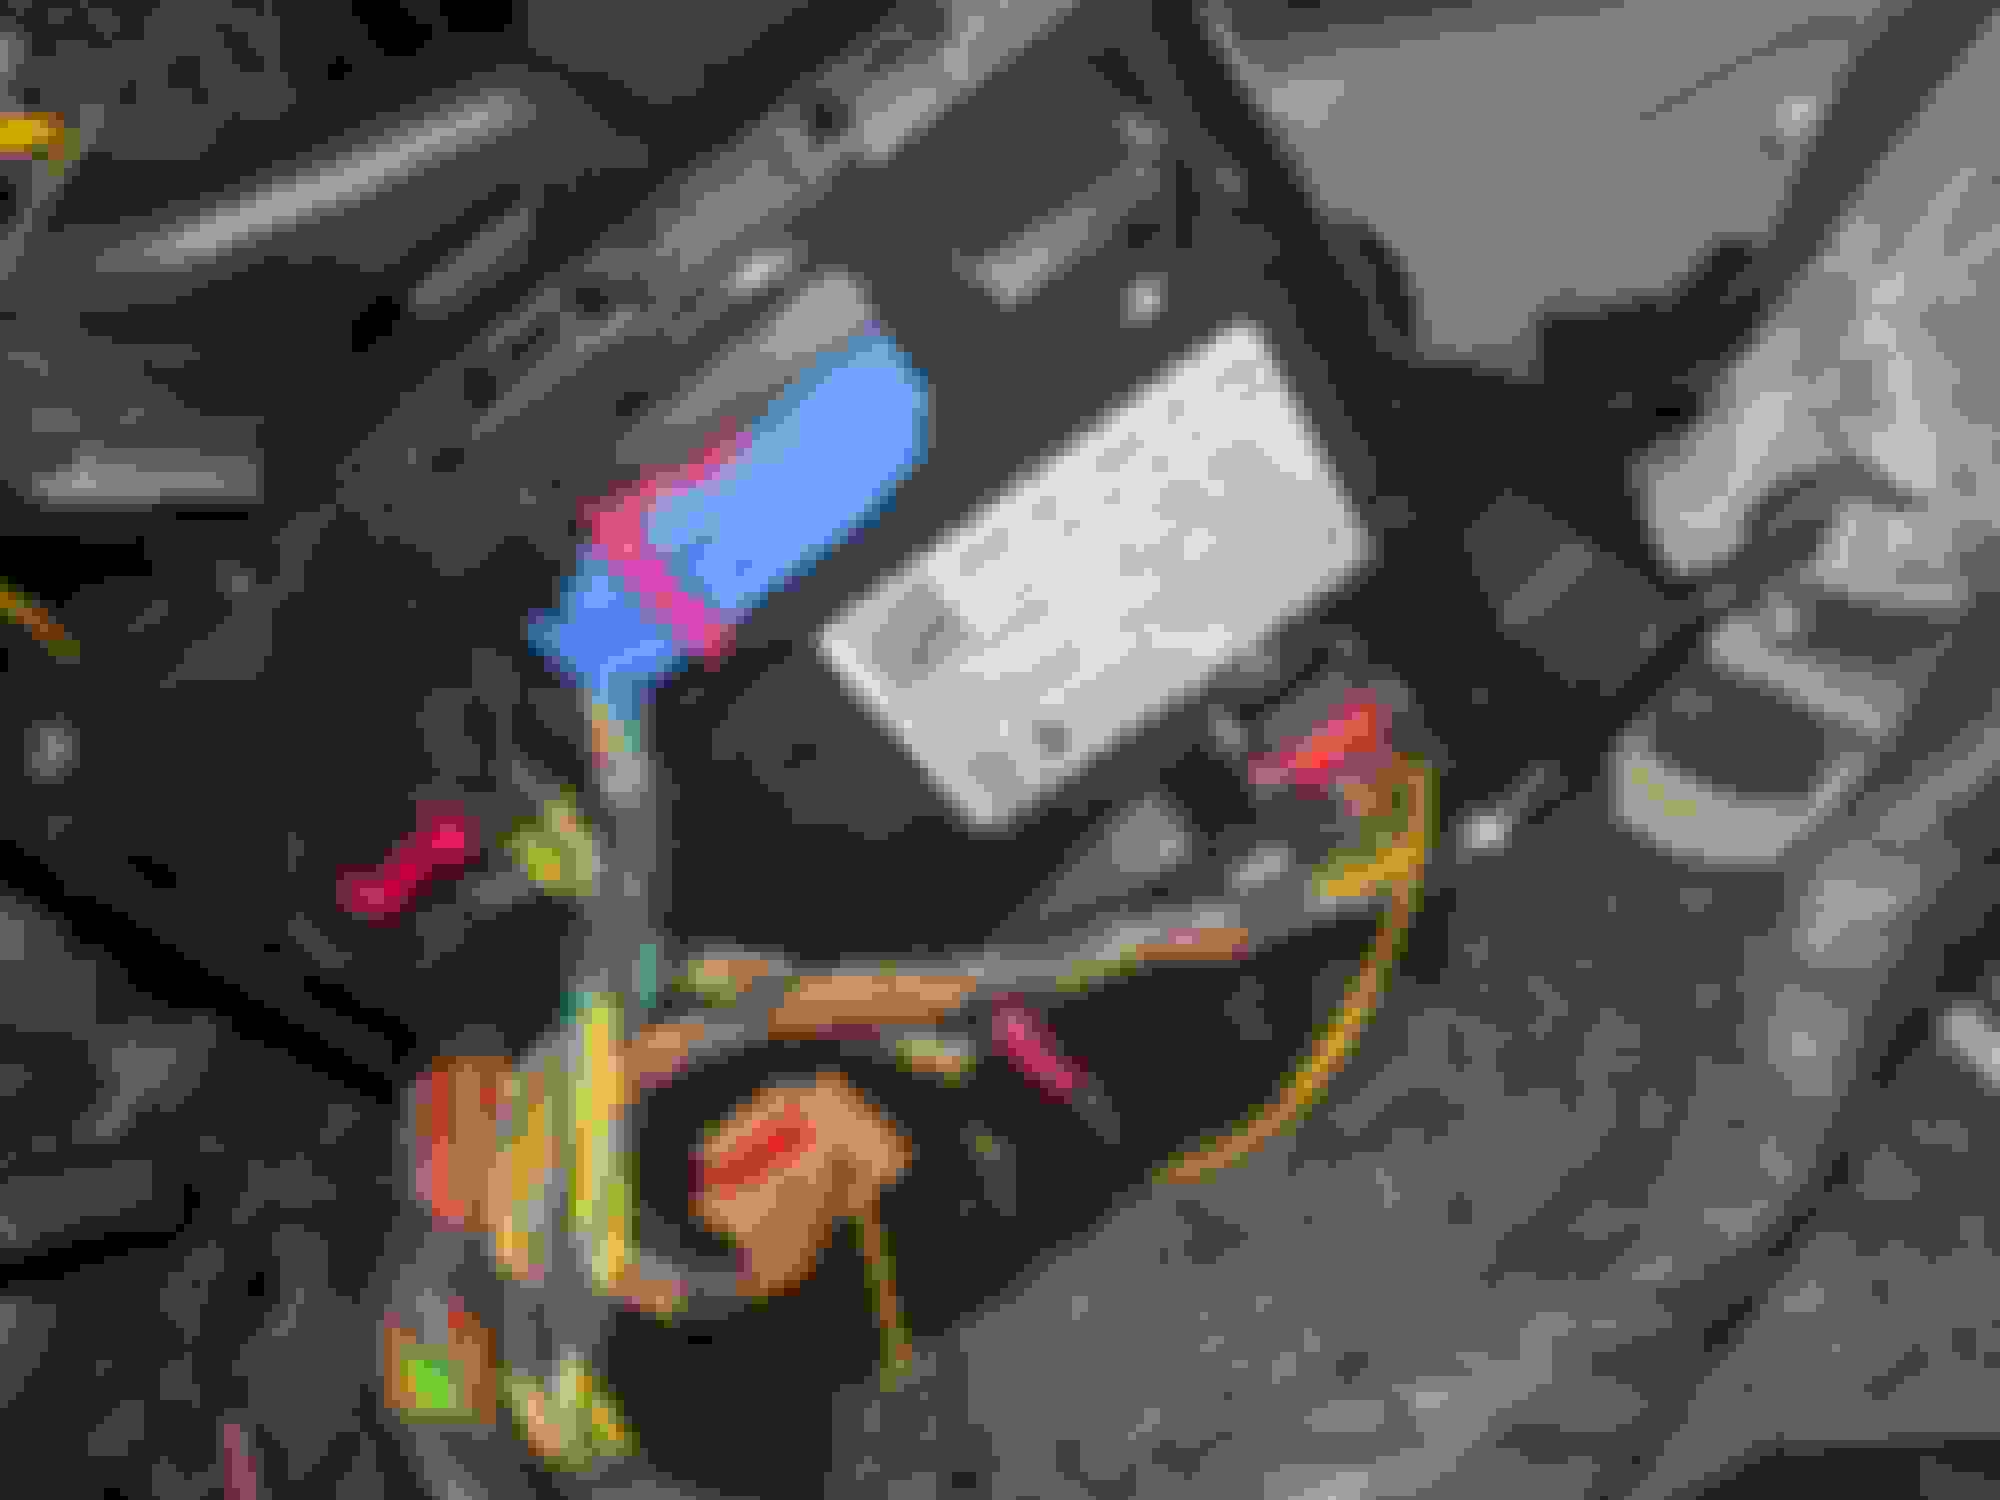
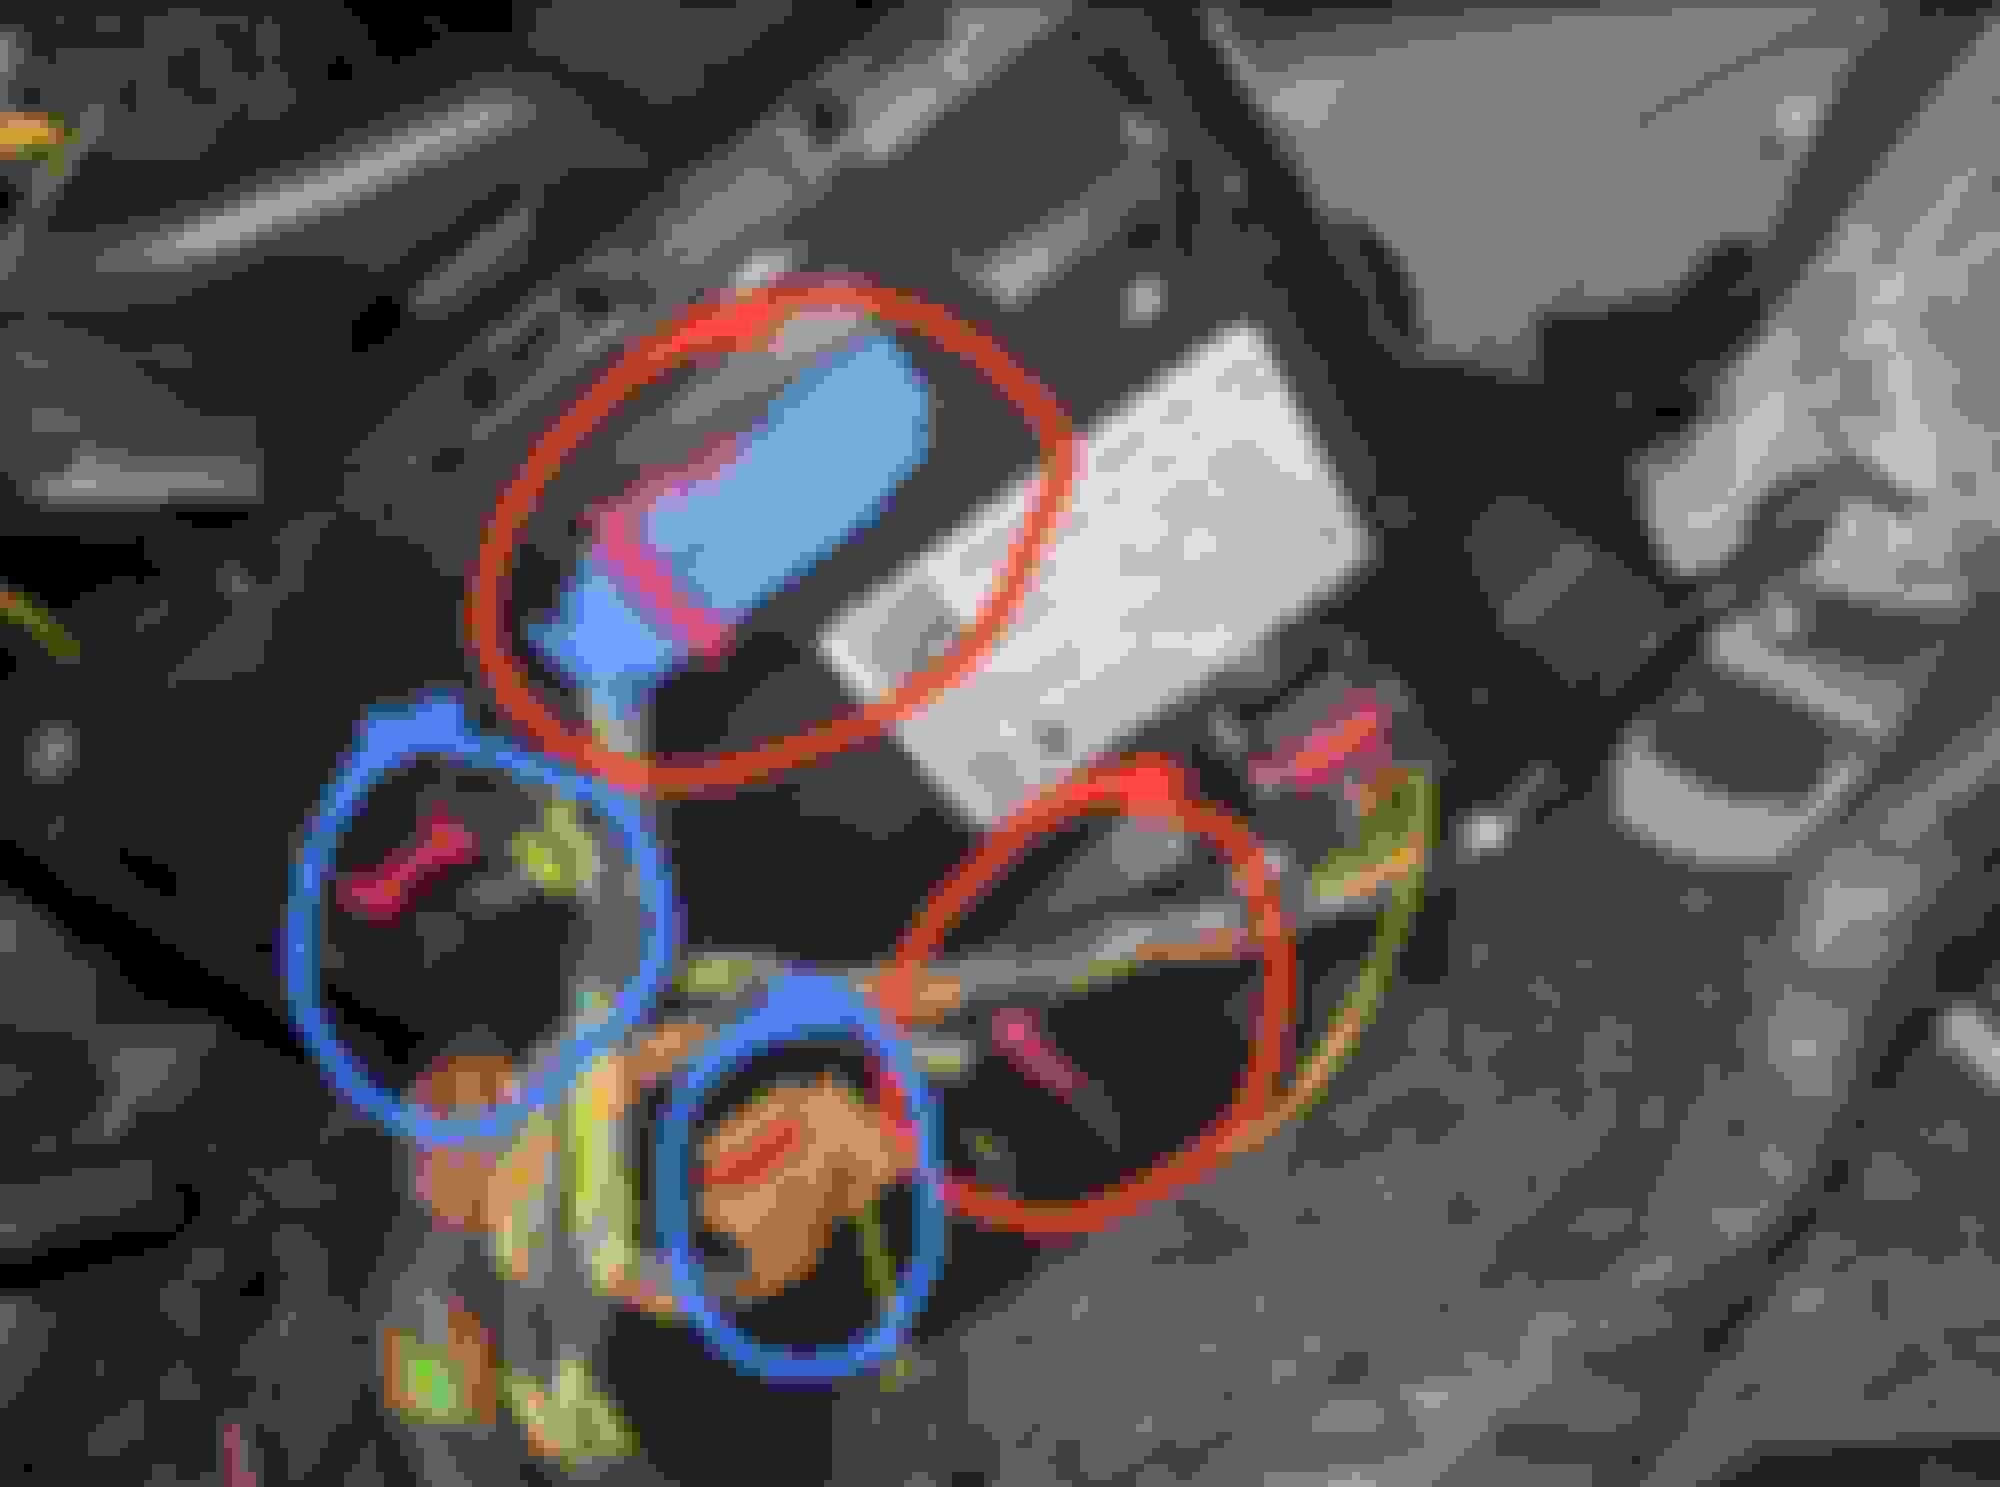
After removing the BCM, it should look like this.
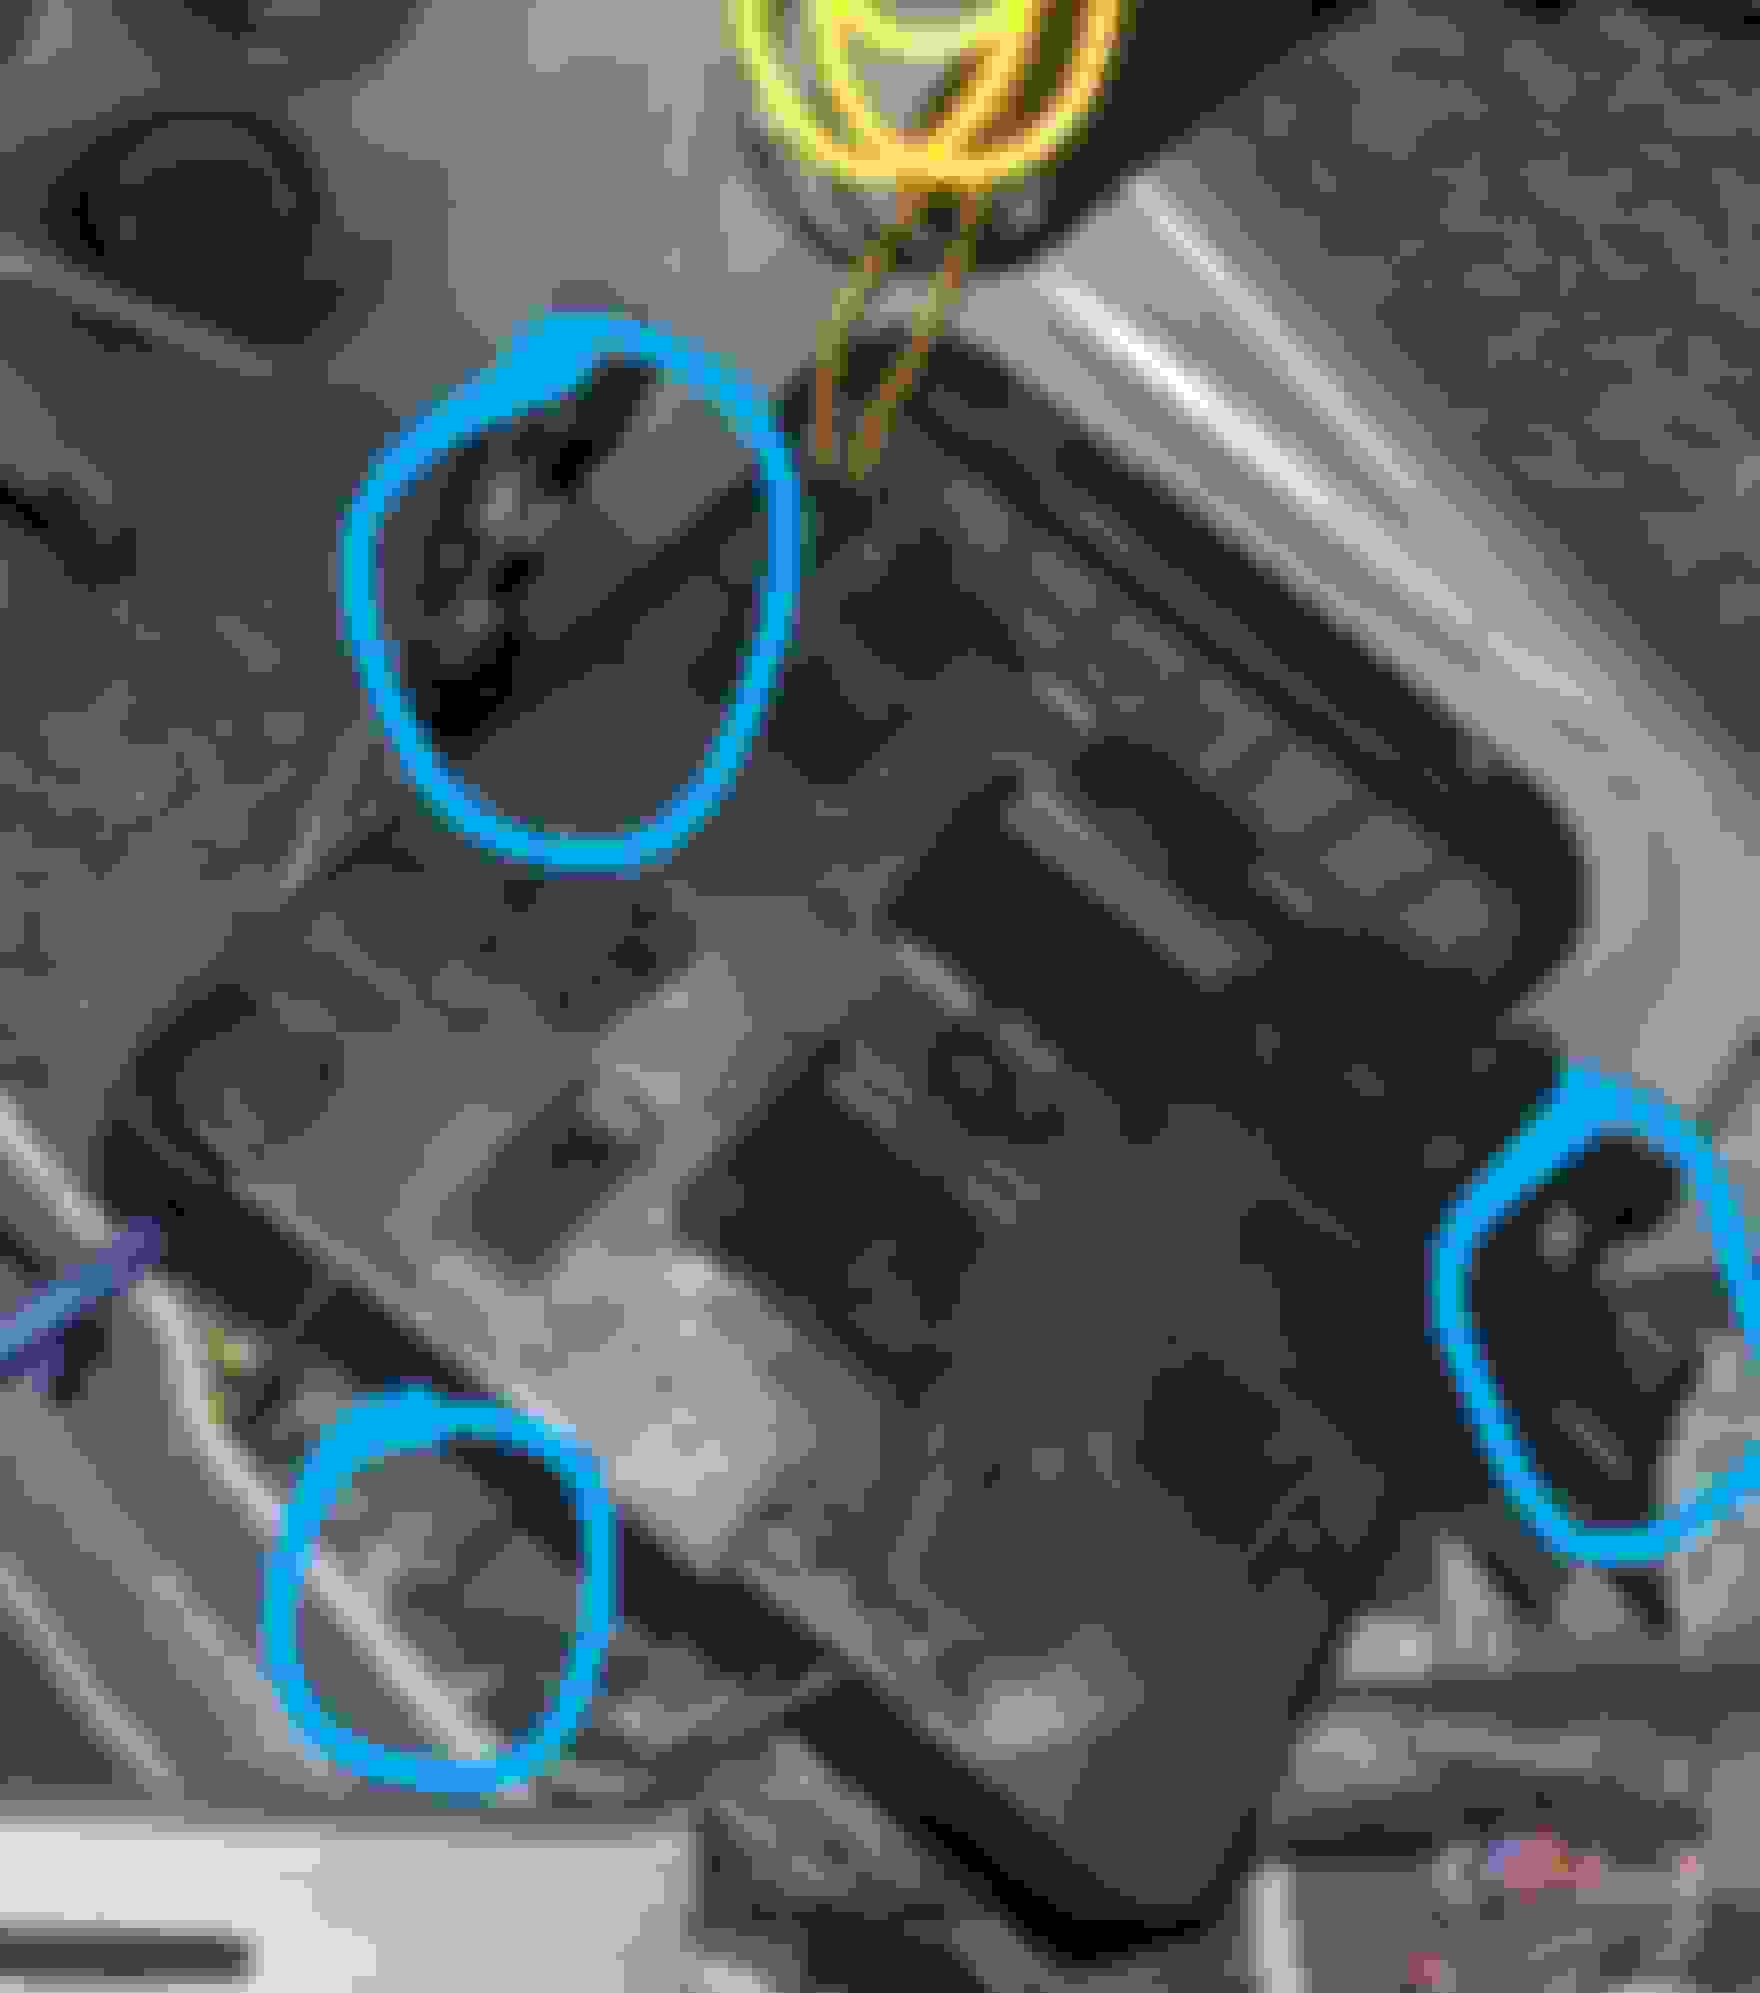
The T Harness connects to the following 4 points, which are all color matched and impossible to screw up.
The connectors circled in red are removed by depressing the center of the connector touching the pink clip down, thereby allowing the pink clips to swing up and release the connector.
The connectors circled in blue are removed by using a little screwdriver, or butter knife, to gently push back the red clip retainers. Then after those are off, the center area of the clips should've depressed and removed from the BCM.
The T Harness has 8 connectors. 4 look exactly like the connectors that were just removed above (they are male).
4 are female and connect to the male ones that came out from the BCM (that are part of the car).
Connect all these, arrange your wires, and refasten the BCM back in place.
After the BCM connections are made, it's time to do the module programming and you will need a helper, or second set of eyes.
1. While looking at the module, have your helper power the car on without starting. There should be a combination of green led flashes from the two LEDs on the face of the module. If there is, proceed.
2. Have the helper start the car. After 15 seconds tell the person to press and hold the brake pedal. Now press and release the small programming button on the module, then press the lock button on the OEM remote 3x. Then have the brake released.
The blinkers should illuminate twice and you're good to go there.
3. Then turn off the car, close all doors and lock it. Leave it alone for 3 minutes.
4.Come back and press lock, lock, lock (3x) on the OEM remote. The car should remote start (Yay!)w the blinkers going off every 7 seconds or so.
Now it's time to do the takeover procedure (which ensures you are able to get in the car and continue with the engine running without it powering off first).
The following must be completed with 45 seconds of opening the car.
1. Unlock the car.
2. Open drivers door, get in, then close it.
3. Press and release brake pedal.
4. The 7 second blinking should stop.
5. Your car should be ready to drive at this point without pressing the push button start.
THE CAR SHOULD NOT TURN OFF AFTER STEP 5. If it does, you failed the takeover procedure and need to do it again after a break and remote starting again.
Going forward, the car will blink every 7 seconds when remote started, until you get in the car and press the brake pedal, telling the car an actual driver has taken over.
 01-07-2020, 05:47 PM