Audi A4 B7/B8: How to Replace Brake Pads/Calipers/Rotors
When the brake sensor light comes on, it's time to change out the pads. There's no sense taking it to the shop and paying those extravagant shop fees. Take a couple of hours and do this job yourself. Getting the brakes done on your A4 is a breeze, just ensure you bring plenty of brake cleaner to take all of the brake dust off from those OEM pads!
This article applies to the A4 B7 and A4 B8 (2005-2008).
It's time to change the pads and rotors. Like any good enthusiast, you enjoy working on your car. You may not as yet have a complete understanding of the procedure or just want to brush up on what's in store for the job. This article will cover how to change out the front and back pads, rotors, and calipers on your A4 B7/B8. There are a few things to be aware of, so pay attention and getting this job done will be a snap.

Materials Needed
- General tool set with metric sockets
- Line wrenches
- Torx socket set
- Large and small flat tip screwdriver
- Large C-clamp
- Rear caliper piston retractor tool
- Drain pan
- Rubber mallet
- Wire brush
- Jack and jack stands
- Brake clean
- Nitrile gloves
- Large bottle of brake fluid (unopened)
- Brake fluid catch bottle with tubing
- Torque wrench which can achieve 100 lb-ft
- Several high strength zip ties
- Silicone lubricant
- Anti-seize compound
- Caliper grease
This article will cover how to change out all of the parts for the front and rear brakes on an A4 B7 model. These basic instructions can also be used on the front axle of a B8, but since it has an electronic parking brake in the rear, there is a whole different procedure that requires tapping into the vehicle computer with specialized software.
Step 1 – Jack up the vehicle
Before raising your vehicle, use your lug wrench to break the lugs free on the end of the vehicle you'll be working on. Using your jack and jack stands, suspend the same end of the vehicle. If working on the front, put your parking brakes on and use some tire chocks on front and rear of one of the tires to safely secure the vehicle. Place the jack stands at the proper locations and lower the vehicle down on them. Ensure the vehicle is secure on the stands. When secure, finish removing the lugs and wheels to expose where you'll be working.
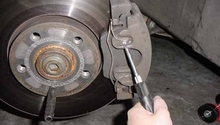
Step 2 – Remove the caliper
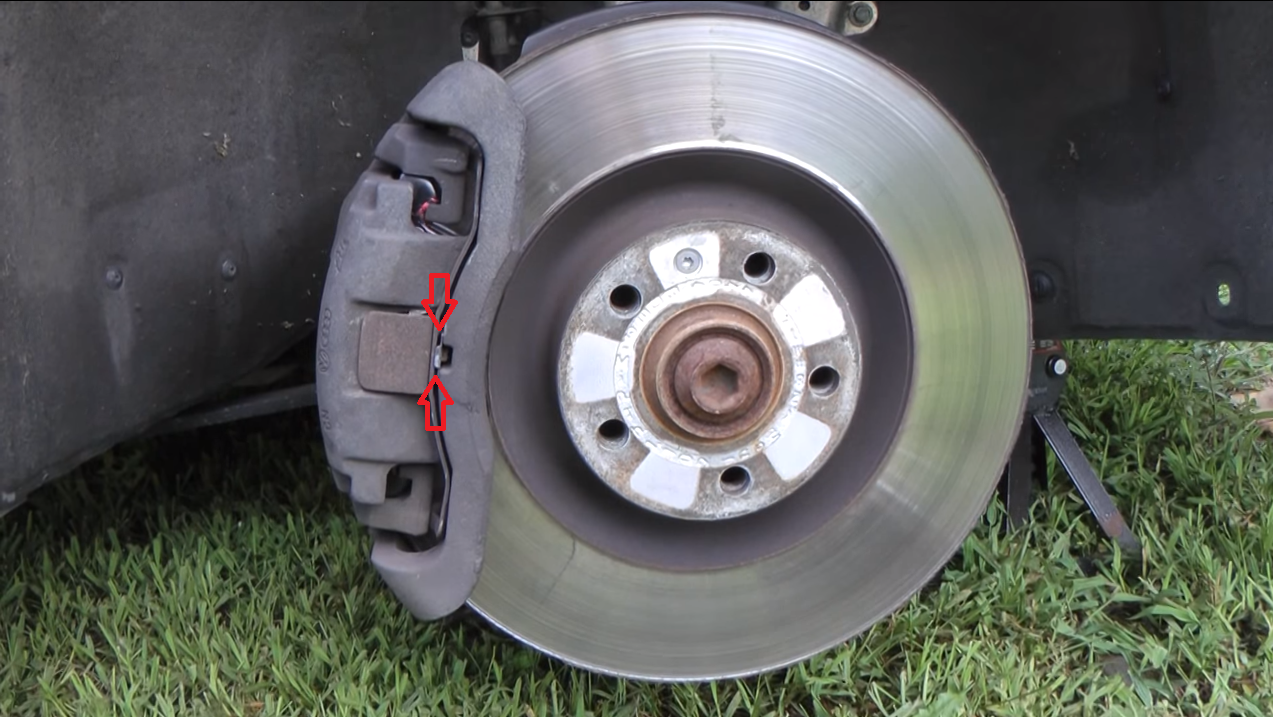
If working on the front, remove the caliper spring by placing a thin flat tip screwdriver in between the spring and the catch point (between the red arrows in Figure 2). This can be tricky, as you'll have to insert the screwdriver and pry the spring up until the small tooth is dislodged from the catch.
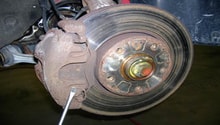
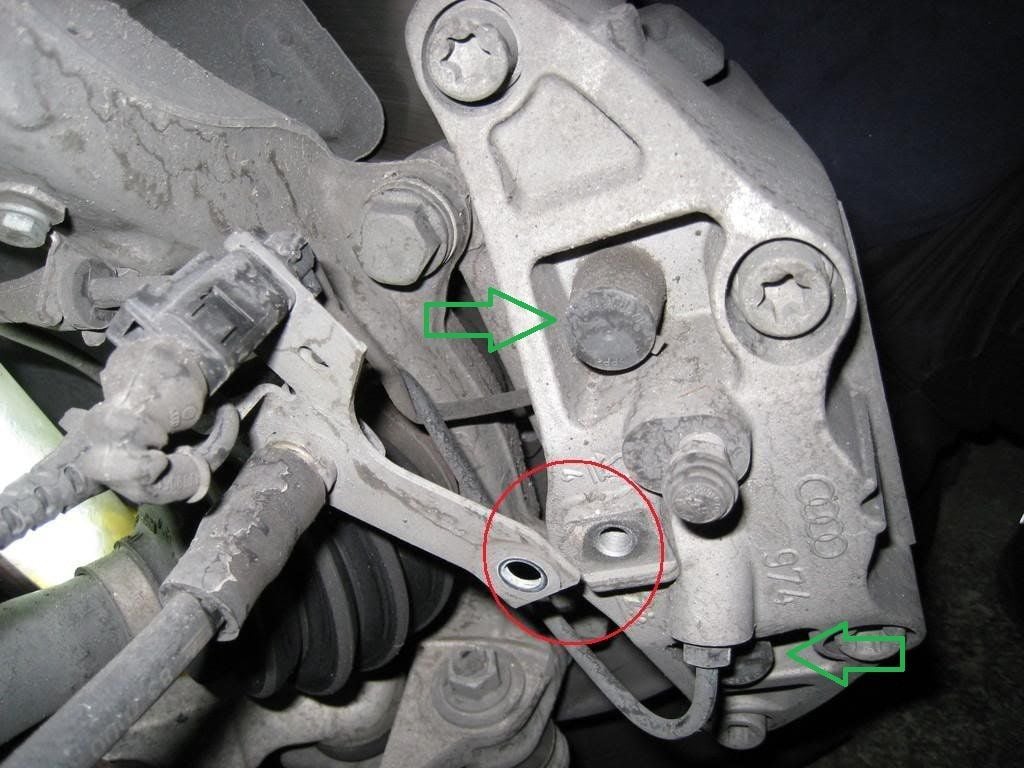
If you are replacing the caliper, remove the 14mm bolt attaching the pad sensor bracket on the back of the caliper (red circle in Figure 3). Remove the two caps located on the back of the caliper (green arrows in Figure 3). Remove the two glide pins, which were under the caps using a T45 or T40 Torx socket (the socket size depends on whether the slide is stock or aftermarket).
Disconnect the brake sensor by first removing the connector by pressing down on the small tab (left side of Figure 4). Then, place your small flat tip screwdriver under the tab (right side of Figure 4) to release the tab, then turn the connector slightly to release it from the holder. With a large flat tip screwdriver or pry bar, remove the caliper from the caliper bracket by prying it away from the brake rotor towards the back of the vehicle. Remove the old brake pads from the caliper. Using a couple of zip ties, suspend the caliper from the spring assembly.

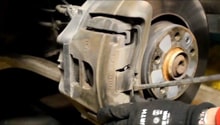
If working on the rear, remove the two bolts on the back side of the caliper, then using a flat tip screwdriver, insert the tip in between the caliper bracket and the caliper and gently pry it away from the brake rotor. Once it becomes lose, don't be surprised if the old brake pads fall away, which is not an issue. If they don't fall away, remove them now. Suspend the caliper from the spring assembly.
Pro Tip
Some instructions will indicate you should remove the four Torx head bolts on the front caliper to split it in half during disassembly. This is really unnecessary and will cause you to remove more bolts than needed. Removing the two guide pins will save you time in the long run.
Step 3 – Remove and replace the rotor
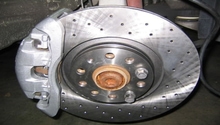
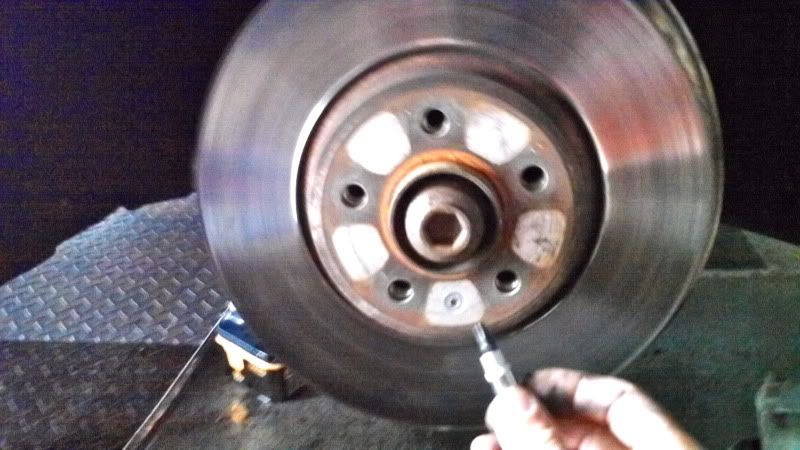
Rotor removal is pretty similar front or back. First, remove the two bolts holding the caliper bracket on and remove the bracket. Remove the Torx head screw holding the rotor to the hub. Remove the rotor from the hub. The rotor may want to stick to the hub. If it does, try some rubber mallet persuasion to remove it. Don't go too crazy on it, as you can possibly damage the hub bearing. Once the rotor is off of the hub, clean up the hub using the wire brush. Once it is clean, put some anti-seize compound on the outer surface where the lugs are, so the rotor won't stick the next time you have to change things. Take the new rotor out of the box and plastic. NOTE: Some performance rotors have protective coating which do not need cleaned off before installation. Read your documentation to see if this is your rotor. If not, clean the rotor on both sides using brake clean and a clean rag or paper towel. Install the rotor as you removed it.
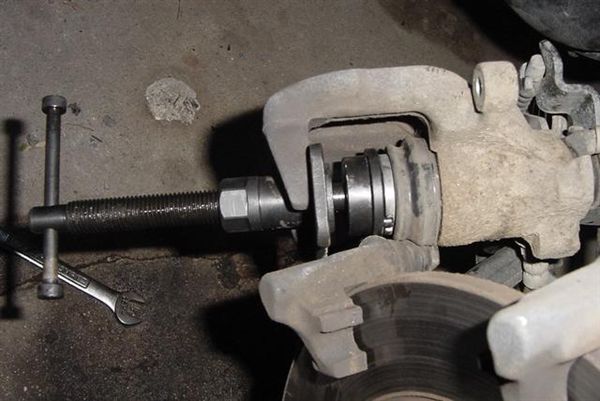
Step 4 – Compress caliper piston or replace caliper
If you are not going to replace the caliper, you'll need to compress the piston in order to get it back onto the rotor. In the engine compartment, clean the cap of the brake reservoir, then remove the cap. Check the level of the brake fluid. If it is to the high mark on the reservoir, you'll need to remove some before you proceed further. If compressing the front caliper piston, place an old brake pad in place on the piston of the caliper. Using the C-clamp, place the jaw end on the back side of the caliper and the screw side of the clamp against the brake pad. Screw the C-clamp down gently to ensure the piston is retracting into the bore. After you are sure it is moving, press the piston all the way down until it gently bottoms. You'll know when you are close as the piston face should be flush with the caliper face. The brake pad should help prevent causing too much pressure on the piston. If doing the back piston, you'll need to screw the adjuster back into the caliper using the caliper retracting tool. On the face of the screw, you'll see two notches which the tool fits into. Screw this all the way back down into position. It should bottom out when you get it all the way down.
If you are replacing the caliper, place the drain pan under the caliper to catch any brake fluid. Using a line wrench, remove the line fitting from the caliper. Replace with the new caliper, ensuring you are using the correct one for the side because these are side dependent. When the caliper is in position on the vehicle, the bleeder should be towards the top. Put the caliper back into position before you snug the line down, so the line will be in the correct orientation when the caliper is reinstalled. If it helps, put the guide pins back in momentarily to hold the caliper in the proper position. The rear calipers can be a little trickier, as you need to remove the emergency brake cable from the caliper. To remove it, push the arm over to create a half loop with the cable, then push the cable down and pull the end out of the bracket. Pull the cable assembly from the caliper. Reinstall it in the new caliper in reverse order.
Step 5 – Reinstall the brakes
Reinstall the brakes as you took them off. Use caliper grease on the back of the pads and on the caliper brackets where the caliper slides. On the fronts, ensure you reattach the brake sensor. Use silicon grease on the guide pins to ensure regular function. Don't get the grease on your new brake pads or rotors.
Step 6 – Bleed the brakes
Even if you didn't change out the calipers, now may be a good time to flush the brake system. Brake fluid should be flushed every two years. If it is dark amber, or worse, green, it's past due. This is a two man job, unless you have a power bleeder. Use your brake fluid catch bottle to ensure you catch all the fluid and to ensure you don't get air reversion back into the caliper. Ensure your master cylinder is full of fluid using a new bottle of brake fluid. Start at the back passenger side, or the furthest point away from the master cylinder. Then move to the next furthest away and so on until all four are done.
If there, remove the bleeder nipple cover. Place a boxed end wrench on the bleeder nipple and then place the bleeder line nipple. Have your help pump up the brakes until some semblance of pressure is felt. If you have replaced the calipers, this will require a lot of pumping as you have to get brake fluid into each of the calipers. When you feel some resistance, have the helper press and hold the brake pedal, then you unscrew the bleeder nipple just enough to hear the air come out, then quickly snug the nipple back down. Have the helper pump up the brakes again and when pressure is felt once more (usually takes two or three full pumps), then they'll hold the pedal. Continue with this method until you see clear brake fluid coming from the bleeder. Also, ensure you check the master cylinder quite often during the process to ensure you don't run it dry of fluid, or you'll have to start all over again to remove air from the system. Once all are bled, the brake pedal should be quite firm when you pump it.
(Related Article: How to Replace Brake Fluid - AudiWorld)

Pro Tip
Rent a power bleeder if available. It will save you or your helper's quads from becoming wet noodles.
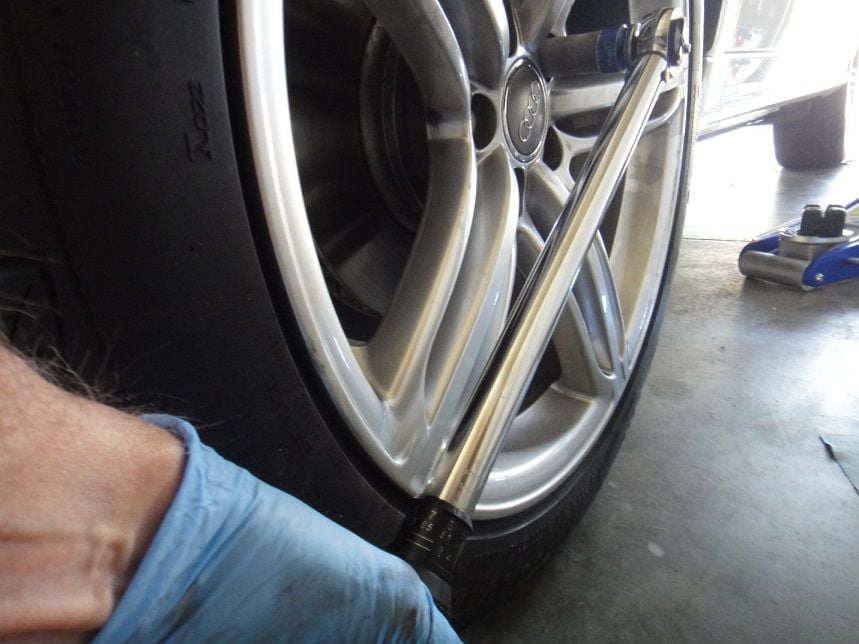
Step 7 – Replace tires
Once everything is back together, put the tires back onto your car. Snug the lugs down so nothing is loose. Lower the vehicle back down so it is flat on the ground. Tighten your lugs using the torque wrench. It works best to run it in two sequences, first to 70 lb-ft, then to 100 lb-ft using a star pattern.
Step 8 – Bed the brakes
Bedding the brakes is a process by which you impregnate the burnished surface of your rotor with brake material from your new pads. It's an easy but vital process to ensure you don't get what most people think is warped pads. It's very important to follow the following steps, unless your pads have a specific bedding process. Read your documentation to be sure, but if they don't, most are going to be something like what follows:
- Once you have your car on the road in a safe environment, run the vehicle up to about 35 mph.
- Press stoutly on the brake pedal to bring the car down to about 10 mph, but DO NOT STOP THE VEHICLE (very important).
- Run through Steps 1 and 2 four or five times, ensuring you never stop the vehicle.
- Drive the vehicle around at a moderate pace somewhere where you will not have to use the brakes much.
- After 15 to 20 minutes of letting the brakes cool, again in a safe environment, bring the car up to about 55 mph.
- Press stoutly on the brake pedal to bring the car down to about 10 mph, but DO NOT STOP THE VEHICLE.
- Run through Steps 5 and 6 four or five times, ensuring you never stop the vehicle.
- Drive the vehicle around again for another 15 to 20 minutes to allow the brake to thoroughly cool.
- Once completed, take the car home and allow the brakes to completely cool before next use.
Your brakes should now be properly bedded. It is very common for new ceramic pads to smoke somewhat during the first few rapid stops. This is normal, but will probably freak you out. This only happens once, so after it's done, you'll have nothing more to worry about.
Featured Videos: Audi A4 B7/B8 Brake Replacement
-
A4/B7 Front Brake Job
-
Servicing Audi Rear Brakes
-
A4 Brake Job Overview
Related Discussions
- Replacing the Brake Pads - AudiWorld.com
- Repair Brake Pads/Rotors/System Bleed - AudiWorld.com
- Brake Pads Replacement - AudiWorld.com
- DIY Rear Brake Pads - AudiWorld.com
- Installing Front Brake Pads - AudiWorld.com