| Tech Article Title
|
Author
|
Date
|
| Installing
a lip spoiler |
Don
Pavlik
|
2001 |
If you're an auto enthusiast you
probably know about the BMW E46 M3. BMW has a very nice lip spoiler
for the M3 deck lid that, although not a perfect fit contour-wise, when properly
installed is a very nice addition to an A4 or S4. Unlike most spoilers the BMW
piece is very discreet and mounts near the rear of the deck lid. Does it
provide additional downforce? Probably not but it does look sweet. No drilling is required to install it as it mounts with a special adhesive
strip. You will need to get it painted to match your car. The paint code for
your car is on a white label in the spare tire well on the passenger side. The
paint shop will need this information to match your paint.
This is really a 2 person job so scrounge up a friend to help you.
Thanks to NickS--his car is featured in this article.
For pricing information on the parts check with a BMW dealer in your area.
The parts
- Spoiler, BMW part number: 51-71-7-893-671
- Adhesive tape, BMW part number: 51-71-7-901-759
- Wax or adhesive cleaner/remover
- Masking tape
click to enlarge
 |
Spoiler part number has been superceded by the number listed above |
 |
Adhesive tape |
 |
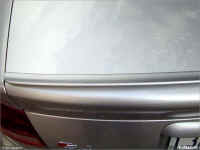
The contour of the spoiler does not exactly match the contour of the
deck lid in it's natural state but with careful installation you can bow
it slightly to match. |
 |
Here's a better example of the contour. As you can see it's not quite
the same radius. |
 |
First, clean off all the wax you've lovingly applied to your glistening
paint. 3M makes an excellent product called General Purpose Adhesive
Cleaner that will ensure a clean and wax-free surface. Most auto parts
stores carry it. Also be sure to clean the mating surface on the spoiler |
 |
To get everything lined up correctly, center the spoiler on deck lid
near where the lid curves downward. The ends of the spoiler will be too
far back. Hold it securely in the center and have the second person gently
bow the spoiler so that it matches the contour of the deck lid. Apply
masking tape near the front edge of the spoiler in several places to mark
it's location and make pencil marks to indicate side to side placement.
Also, mark the center of the spoiler and deck lid for initial placement.
The tape and marks will ensure it's where you want for final placement.
The adhesive strip is extremely sticky... you'll only get one shot at
placement. Measure carefully. |
 |
Once you've got everything marked, peel off the paper side of the
adhesive strip and apply it to the spoiler. Align it slowly and
carefully--you only get one chance! You'll need to trim the tape with a
razor blade as it's longer than the spoiler.
I strongly recommend you use the factory tape. It's very thin,
extremely sticky (almost gooey putty) and invisible once installed.
Other tapes may be too thick and not allow the spoiler to sit flush on the
deck lid.
Next comes the scary part. For placement, we removed an 8" section
of the adhesive backing at the center of the spoiler, aligned it with our
center tape edge and pencil mark and then pressed it into place. Make sure
you have the ends of the remaining adhesive backing pulled off enough so
you can pull it off the rest of the way before putting the center down.
Don't remove all the backing until you have the center placed correctly or
the ends may touch somewhere and make a mess of the whole works. Now,
while your pal holds the center securely, slowly pull of the remaining
backing off, align the spoiler with the rest of your tape marks and press
it into place. Stand back and admire your handiwork.
|
 |
Rear shot |
 |
Another |
 |
Note that after bowed it fits the contour of the deck lid perfectly. |
|


