| Tech Article Title
|
Author
|
Date
|
| Installing
S4 Lower Trim |
Norman
deDios
|
2002 |
First, be prepared to make several trips to your local
hardware store. I made numerous trips to buy the proper bolts, tapping screws,
Goo Gone, etc.
It's annoying but worth it to do it right the 1st time. A good assortment of
torx & phillips head sockets are very helpful too.
You'll need the 3 metal brackets on each side. You'll need to drill into the
attatchment points of the chassis. A good power drill & a steady hand are
required. It's really easy though. Just drill straight. A crooked hole does you
no good. I used a clamp (the springy kind that looks like the letter
"A" ~ $2.49) to secure the brackets while I lined them up properly
& drilled. I highly recommend getting 3 of these clamps so you can do an
entire side at once. Lining up, then removing the side skirts 3 times per side
was a pain.
INSTALLING REAR BRACKET: (those aren't the clamps I used)
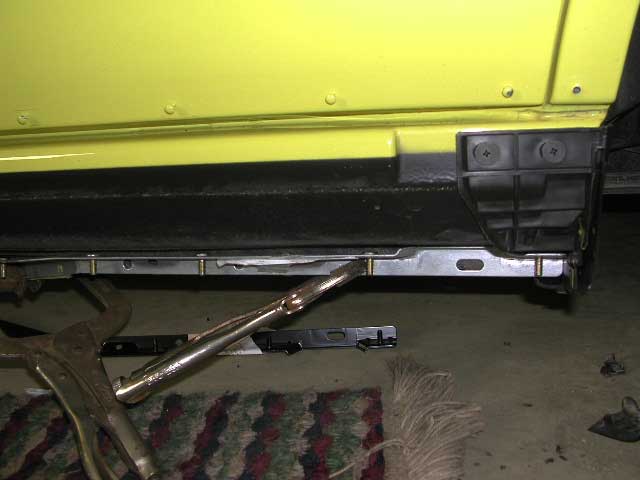
REAR BRACKET INSTALLED:

FRONT BRACKETS:

You'll also need the ring clips that secure the "flaps" on the inner
part of the skirts. They fit into the holes on the side skirts & into the
chassis. You'll know which holes when you look at the skirts. There are 10 rings
& 10 caps (P/N 8A0-854-953) that go w/ them. Audi asks ~$3 per ring. Yipes!!
Cha-ching!
RING CLIPS GO HERE ON UNDERSIDE:

The side skirts are secured along the door sills by long plastic strips. These
strips are stuck on the car using double sided tape. Use the heavy duty 3M
stuff. 1 roll should be enough. Just stretch it to put down a thin strip along
the plastic piece. The skirts themselves are then attatched using velcro. Yes,
velcro. Again, use the heavy duty stuff from Home Depot. ~$4.50 for a box of
4ft. A plastic putty knife will help w/ scraping the adhesive off from under the
door sill trim. Get one of those too. The 2.5" size was perfect.
ADHESIVE UNDER DOOR SILLS


ADHESIVE REMOVED W/ GOO GONE:

The door trim is secured by a hard rubber strip that snaps onto the backside of
the trim & then slides onto fasteners on the door.
DOOR TRIM CLIPS ONTO THIS RUBBER STRIP:

THE RUBBER STRIP IS HELD TO THE DOOR BY THESE CLIPS:

On the rear section of the skirt, you'll need the plastic bracket that looks
like a mud flap. It holds the back end of the skirt in place.
"MUD FLAP" BRACKET:

Overall, you'll need time too. With all the adhesive tape removal (Goo Gone
requires lots of elbow grease) the install took me ~2 days. I was really careful
to do things as close to OEM as possible to prevent any future fitment issues.
I'm picky that way, but again careful planning goes a long way w/ the quality of
your install. I'm EXTREMELY pleased with the outcome. I wish Audi made our cars
look like this from the factory. The lines look soooo much cleaner w/out the
annoying black vinyl trim.
Here are almost all the parts I used. The total cost was ~ $1000. Youch! I
bought the parts little by little & it didn't seem that painful in the end.
I purchased them from Audi dealers
around the country. Needless to say, I shopped around. I was able to save some
money by using some nuts & bolts bought from my local hardware store instead
of the Audi ones.
The paint job cost me ~$200 for all the lower trim.
Part listing:
(1) 8D0-853-859-GRU trim
(1) 8D0-853-860-GRU trim
(1) 8D0-853-923-01C holder
(1) 8D0-853-924-01C holder
(10) 8D0-854-955-B-01C-GRU ring
(10) 8A0-854-953 cover
(1) 8D0-853-941 strip
(1) 8D0-853-942 strip
(1) 8D0-854-973 clamp
(1) 8D0-854-974 clamp
(1) 8D0-854-977 clamp
(1) 8D0-854-978 clamp
(1) 8D0-854-983 clamp
(1) 8D0-854-984 clamp
(1) 8D0-853-959-A-GRU moulding
(1) 8D0-853-960-A-GRU moulding
(1) 8D0-853-969-A-GRU moulding
(1) 8D0-853-970-A-GRU moulding
(1) 8D0-853-959-A-GRU moulding
(1) 8D0-853-953-B-GRU moulding
(1) 8D0-853-954-B-GRU moulding
(1) 8D0-853-963-B-GRU moulding
(1) 8D0-853-964-B-GRU moulding
(1) 8D0-853-974-B-GRU moulding
(1) 8D0-854-861-A-GRU cover
(1) 8D0-854-862-A-GRU cover
Here's the finished product. Enjoy!!


