Required tools:
1. 3/6mm allens (6mm allen should have an 8"
reach)
2. Socket set with metric sockets, extension, ratchet 8mm and
10mm open end wrench.
3. Circlip Pliers
4. Torx25 driver
5.
Loctite (although not a tool, also not supplied but HIGHLY
recommended)
6. Shop towels to wipe your hands free of grease!
7. A
friend is a valuable tool to assist you in the install, although not
required
also highly recommended.


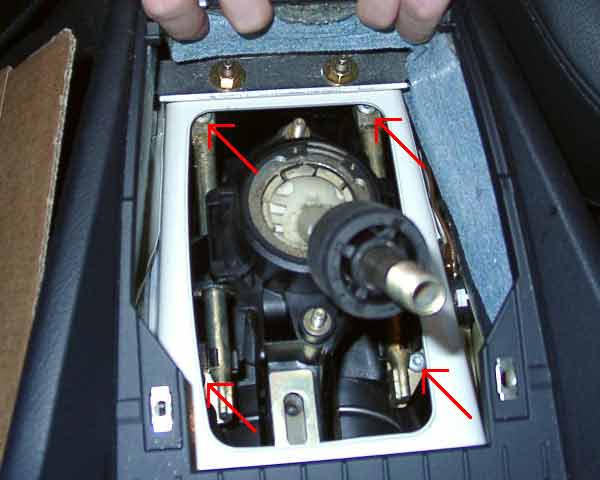
Step
1: is to remove the shift knob by turning the knob counter clockwise till
the knob is off. Then carefully lift up at the seem between the
shifter assembly
cover and the center console as depicted by the red
arrows.


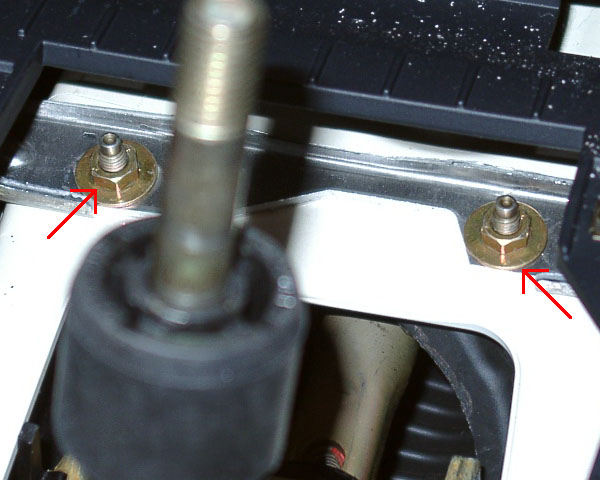
Step:2
With a 10mm socket wrench, remove the 2 10mm nuts holding the foam padded
sound break.

Step
3: You will then see the core of your shifter assembly. Now with your 6mm
allen wrench remove the two bolts and the one metal plate that
connected the
shifter linkage to the transmission linkage. They are
loctited from factory
and so a standard allen wrench may not allow you
to provide enough torque to
remove them. In this case, use a 6mm
socket wrench adapter to remove these bolts.
Step
4: With the 2 6mm bolts removed, loosen the front 2 10mm nuts holding the
shifter "bucket". You do not need to remove these two nuts, just
loosen.

Step 5:Completely remove the rear 2 10mm nuts. This will allow you to
gain access
to the 4 torx bolts.
Step 6: CAREFULLY remove the 4 torx bolts (T25) that hold the shifter
assembly
down. Be careful to not drop/lose one of the bolts between the
shifter bucket
and the center console.

Step
7: Once you remove the 4 torx bolts, work the shifter linkage free from
the transmission linkage (bottom arm). Once that's done it's easiest to
get the
assembly out by pushing the top connection to the left as
shown and pulling
the linkage out. It might take some work to get the
assembly positioned to remove
it.

Step 8: With the shifter assembly out, take your circlip pliers and
remove the
circlip that holds the linkage to the assembly.

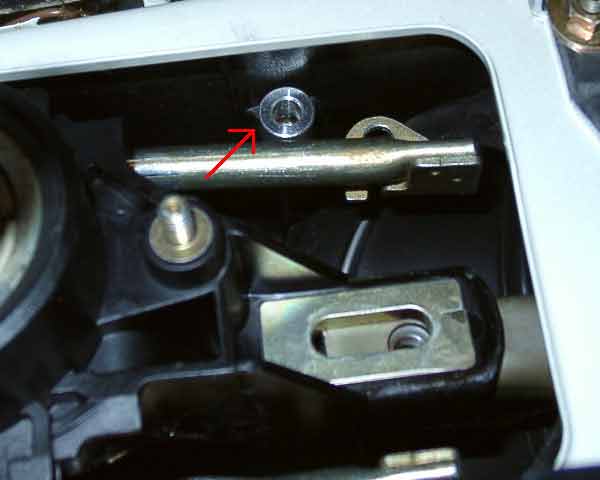
Step
9: At the joint where the bottom linkage connects to the upper linkage,
remove the 10mm nut/bolt holding the linkage together. This will allow
you to
remove the stock linkage from the assembly.
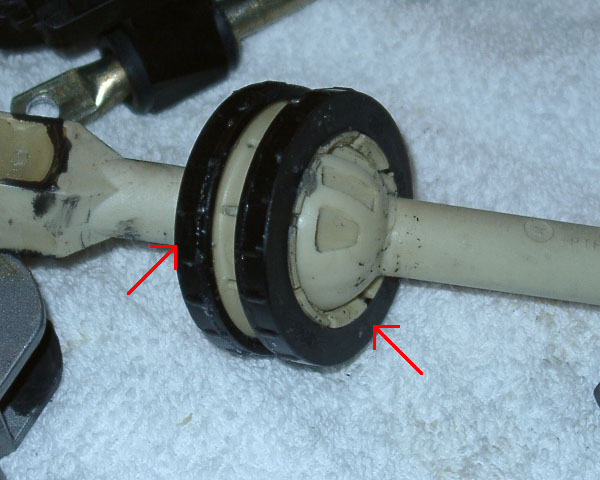
Step
10: Now remove the 2 rubber dampers from the flexible pivot cup, then
remove the pivot cup from the stock shifter linkage.

Step
11: Take the packet of silicon grease and liberally apply to the ball.
Install the flexible pivot cup to the Stratmosphere shifter linkage.
Tie the
zip tie around the pivot cup. You should notice a decrease of
slop/play in the
shifter. Do not over tighten.
Note: put the
side with the notches facing upwards away from the bearings. Reassemble
the black dampers, the linkage should look like the
following.

When replacing the circlip remember to place the metal spacer from the
original assembly between the damper and the circlip.

Step
12: Assemble the lower portion of the linkage. Place one shim between the
bearing and the lower linkage on each side(3 were included, you only
need 2)
Use a pen/small screwdriver to position the shim and secure
with the provided
bolt and locknut. Tighten until the bolt does not
spin freely, but do not over tighten.

The assembled linkage should look like the picture above. Note the
position
of the lower linkage in relations to the shifter arm. The
hole is facing the
bottom. This is crucial during reassembly.
Step
13: Now reassemble the shifter assembly into shifter bucket. Place one
of the 4 aluminum spacers under the ends of the 2 rails that hold the
shifter
in place. Again be careful to not lose a spacer. Tighten down
the 4 torx bolts
at this point.
Step 14: Reverse the
disassembly process. First replace the two 10mm nuts at
the back, and
tighten down the two in the front of the console. Now using the
unsupplied loctite you purchased, place a small amount on the thread
of the
2 6mm bolts that connect the shifter linkage to the
transmission linkage. This
is a very important step in
preventing the bolts from vibrating loose
over time. Now position the
shifter so that the bottom linkage is easily accessible,
reinstall the
plate and the bolt. Do not completely tighten the bottom 6mm bolt,
you
will adjust this later to ensure proper alignment of the assembly.
Reinstall
the top 6mm bolt, again do not tighten completely. Now with
both bolts partially
tightened, align the shifter in the position
sliding it forward and back until
it's sitting in the position you
want it to be. Now tighten the two bolts (snug)
and reinstall your
shift knob. With the engine OFF, test that you can
easily shift
through each gear including reverse. Make sure that the distance
between shifting from neutral to third, and neutral to fourth is the
same. If
you can engage all gears easily, and the bottom linkage
doesn't come in contact
with the shifter bucket, tighten down the 2
6mm bolts completely. Now reinstall
the sound break, and the 2 10mm
nuts that secure it. Carefully reinstall the
shifter cover/shift knob
and take your car for a spin! You're done! Now how
hard was that????
*DON'T ANSWER THAT!* =)

Pictures
used in this how-to are of Alan's fingers and his gorgeous pearl white
A4.